Pumpkin French toast


I had a few requests over on Instagram yesterday for the recipe for these pumpkin french toasts.  So here you go:

The recipe below used the entire bag of pumpkin bread.  I like to make a big batch and then freeze what we don't eat.  Then my girls have a quick easy breakfast before school that isn't cold cereal.

Ingredients:
 Pumpkin bread (make sure it is bread that has yeast in it so that it is like sandwich bread and not like banana bread)  This is the bread I used.  Sorry it is upside down.
5 eggs
1/2 c almond milk (or use whatever milk you have I just like almond milk plus it only has 15 calories)
Cinnamon to taste.  We like a lot of cinnamon so I add it couple times after I have covered 4 or 5 pieces of bread, then I sprinkle more cinnamon in the bowl and mix it up a little bit.  Plus the little helpers love to sprinkle it into the bowl.

 
Mix all the ingredients (except for the bread) into a bowl  with a fork.  Make sure your eggs are mixed in really well.  
 
Then take one piece of bread and put it into your bowl of egg mixture.  Coat one side and then the other.  Place the bread on the griddle and then repeat until you griddle is covered.  Flip them as they brown and then serve with your favorite syrup.  We used just regular ol maple syrup but I think that this recipe would be yummy with it (Coconut Syrup Recipe)

Book Review: Sparkle Factory: The design and craft of Tarina's Fashion Jewelry and Accessories

I was asked to review this book a few weeks ago and of course I was excited to check it out because it has one of my favorite words: SPARKLE!  It was definitely filled with lots of eye candy with all the bright and fun pictures.  There are also some great tutorials on how to make fun jewelry.  So make sure to go check it out:  The Sparkle Factory: The Design and Craft of Tarina's Fashion Jewelry and Accessories Follow Me on Pinterest Follow on Bloglovin

50th Classy Birthday Party with a Quick Gift and Quick Cake

Do you need a quick and easy cake decorating idea? I found this on pinterest and got the instructions from this blog (Spiced Blog)
We did a surprise 50th birthday party for my mom. She was surprised but we knew that she wouldn't want to to have all the black and over the hill stuff. So instead we did bling cause she is a classy Lady.
Of course we also had to get her a blinged out "candy cane" as my 4 year old calls it.  We just took a metal can and spray painted it hot pink and then glitter over the top of that.  It was a fun and quick little gift. 

Follow Me on Pinterest Follow on Bloglovin

Book Review: Play-Doh Shapes and Letters Books

I was asked to do a review on 2 different books. I was so excited to check these books out because I knew my girls would LOVE them!


They are the Play-Doh Shapes book


and the Play-Doh Letters book.

They are really fun books because my girls were able to read them and look at the fun bright pictures and then after that then they pulled out the play-doh and played with it.  It was really fun for my 4 year old because she is loves learning and working with letters.  So make sure to check them out!  
 Follow Me on Pinterest Follow on Bloglovin

Cute Ruffle Curtain with Tie Backs

I am toying with the idea of making curtains like these:
For my sewing room.  I made the ones in the picture for a custom order.  The valance measures 44 inches wide and 20 inches long.  The tiebacks are 1.5 inch grosgrain ribbon. 

Decisions, decisions...What do you think?

The curtain is available at A Vision to Remember Etsy Shop

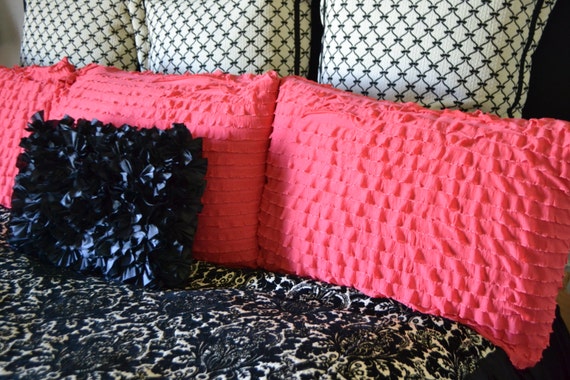
How to Sew a Ruffle pillow with Ruffle Fabric

I have had a couple requests lately to make some ruffle pillows.  The one pictured above is a standard size pillow sham.  I used 1 inch ruffle fabric.

Here's how to do it.
1. decide the size you want your pillow
2. You will need to cut a total of 3 pieces of fabric.  For a Euro pillow sham I cut the front piece 27 inches square, 1 back piece I cut 27x13 inches, and the other I cut 27x20 inches.  That way you can have an envelope type place to stuff your pillow into.
3. Make sure to cut your fabric 1 inch bigger all the way around from the size of pillow you are wanting.  The coral pillow I did ruffle fabric front and back. 
4.  Pin the front and back pieces into place with the right sides touching.
5. Sew around the perimeter.  I like to use my walking foot when I sew with ruffle fabric.  It seems to stretch a lot and the walking foot helps to prevent the stretching while sewing.

6.  Clip the corners of the pillow so that when you turn it right sides out the corners look better.
7. Turn the pillow right side out and check to make sure that all your ruffles stayed in the right spot.  If not, then unpick that spot and sew it again.  I swear that every pillow I make I end up unpicking a couple ruffles :)


8.  Put your pillow into the pillow sham and ENJOY!


If you don't want to make your own pillow you can purchase them here on A Vision to Remember on Etsy


Quilt in Progress


You all know that I love to do custom quilts, right?  Here is the latest twin size quilt. It's bright. It's girly. It's got ruffles, scallops, and appliqué flowers. What else could one want?

Stay tuned for the update WITH a ruffle skirt!  I'm do excited for this set to come together!

Summertime Fruit Salad with Frozen Pudding Bites

 
I am always wanting a nice, refreshing, and light summertime treat. I love pudding, ice cream, and other frozen treats and fruit.  So I thought...why not combine them?!?

You will need a box of strawberry creme pudding, a silicone mold, almond milk (you can use regular milk, I just wanted low calorie), and your choice of fruit.

Recipe: Mix pudding with 1 to 1 1/2 cup almond milk (if you are using regular milk follow the boxes directions).  I have read online that almond milk makes REALLY thick pudding so to half it.  I wanted mine a little thinner so I just kept adding almond milk til I got to the consistency that I wanted.  

Put your pudding into a mold.  The mold I used is from Wholeport.  The cubes are about an inch square. 

Freeze until solid.

Cut up the fruit you want.  I used mangos, strawberries, red grapes, and an apple.

Pop the pudding pieces out of the mold and mix with your fruit.  Let the pudding sit for a couple minutes to let them soften and ENJOY!

Let me know how you like the recipe...Thanks for following along!

Let's Get Social

Image HTML map generator


Featured Post