New Pattern Disappearing 9 Square Block Rag Quilt


Have you ever heard of a disappearing 9 square patch work quilt? Well this quilt is so easy, no binding, no quilting. Just a little ragging. This rag quilt measures about 45x45 inches, but of course it can be made into any size that your heart desires.

For this blanket I used 2 different flannels that have the same daisy print. Then I combined it with other flannels and cotton prints and solids that match. I think it turned out super cute.


I have a new pattern available in my shop. This ones is really super easy.

Baby Quiet Book

Today I made this quick quiet book for my baby. Instead of using felt I used a levi jacket and a pair of kachi pants. It was a quick and easy project. All of the edges are raw so that they can fray. It was a quick and easy.
baby quiet book no felt levis and raw edged ideasI used raw appliques so that it would all fray. My daughters name starts with an A.
baby quiet book no felt levis and raw edged ideasThis page has a bunch of buttons looped onto a ribbon. The ribbon is sewn into the pocket so that the buttons can all be stored in the pocket.


Buttons strung on ribbon that can be inserted in the pocket
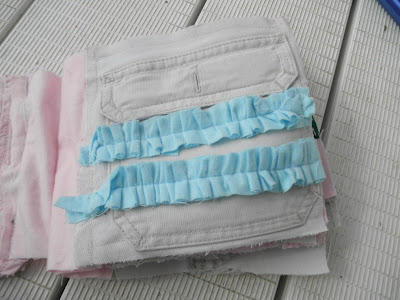
baby quiet book no felt levis and raw edged ideasThis page I sewed down the pocket and added some ruffles
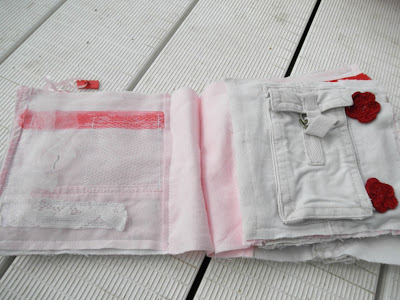
baby quiet book no felt levis and raw edged ideasThese pages are lace and tulle on one page for the textures. The other page has a couple of crochet flowers along with the pocket.
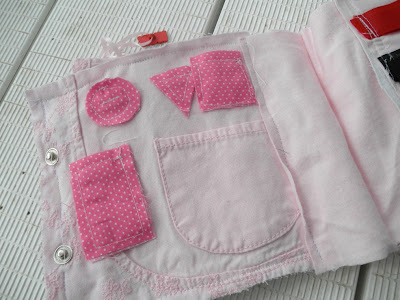
baby quiet book no felt levis and raw edged ideasThis page has the shapes that can be put in the pocket and have velcro on the back
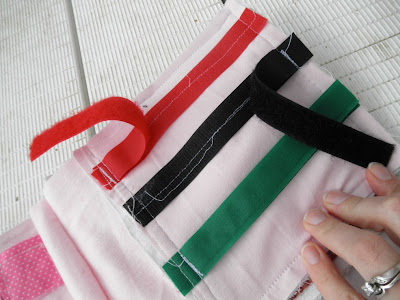
baby quiet book no felt levis and raw edged ideasVelcro for more textures and fun
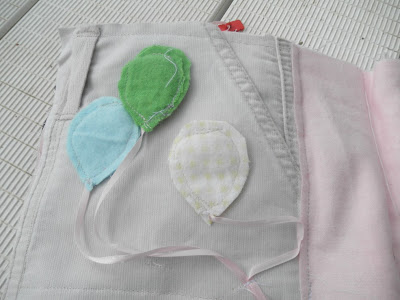
baby quiet book no felt levis and raw edged ideasBalloons can be stored in the pocket along with velcro on balloons
baby quiet book no felt levis and raw edged ideasNoahs ark and some animals.
baby quiet book no felt levis and raw edged ideasA zipper
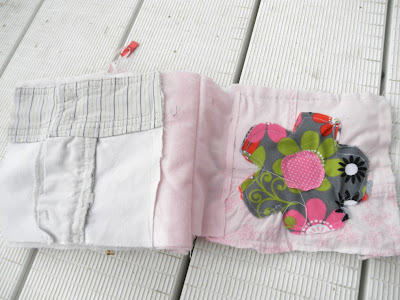
baby quiet book no felt levis and raw edged ideasA flower on top of a pocket
baby quiet book no felt levis and raw edged ideasSome ribbon
baby quiet book no felt levis and raw edged ideasand the "fly" of the pants
baby quiet book no felt levis and raw edged ideasFlower
baby quiet book no felt levis and raw edged ideasAnd the back pocket

This book will be given to my baby girl from my 4 yr old for her birthday. She had tons of fun helping me design the book and can't wait to give it to her.

The squares are all 6 inches square. I assembled each individual side. Then my daughter picked out the order. Then I sewed the squares together that would be back to back. Then I cut out pieces of flannel that measured 6 x 4 inches. Then I sewed those pieces of flannel onto each page so that there was a page of the book, the flannel, and then another page of the book.

So the first page was sewn to the last page. After I finished assembling that part. I then layered them all together and sewed down the middle of the all the pieces of flannel to form the book.

I did not purchase anything special for this book. I had everything in my stash of crafty stuff. This book is full of tons of love.


Ribbon Scrap Bracelets


This was my entry for the SYTYC for this current season. Sadly, I came no where near making it
scrap ribbon bracelet with beaded flowers satin ribbon elastic waistband wire easy craft projectI love to sew, but with sewing comes a lot of scraps. I just can't seem to throw away those small pieces of fabric and elastic. I made this bracelet with the rest of the waistband elastic from a skirt that I was making.

scrap ribbon bracelet with beaded flowers satin ribbon elastic waistband wire easy craft projectI just love how sophisitcated and pretty it is. Don't you think?

scrap ribbon bracelet with beaded flowers satin ribbon elastic waistband wire easy craft projectI made these fun bracelets out of stretch elastic, satin ribbon, beads, and buttons.

Mothers day Present

We are doing a little last minute picture collage for my mom for mothers day. It is going to include all the grandkids hopefully. Luckily for you guys, my mom does not check my blog. So here is a little preview of my daughters and their photo op :

simple mothers day gift picture collage child with poster nanaQuestion: have you ever tried to get a mobile baby to hold still for 2 minutes while you take a picture.
simple mothers day gift picture collage child with poster nana
or have you tried to get your 4 yr old to hold very still so that you can hurry and pose the said baby and take a snap shot of themsimple mothers day gift picture collage child with poster nanaThis is what we came up with. I hope you enjoyed our little preview. Oh and there will be 5 families pictures total. And so you guys don't think that I am a bad daughter we do have flowers and a book for her already I just thought this would be a great addition for her

How to Sew a Minky Baby Blanket with Satin Ruffle Binding

This baby blanket is super soft. I made it with zebra print minky fabric and fluffly baby pink minky. I also used satin fabric to create a boutique ruffle.

I finally gave in and bought a camera after I lost my last one. I just got in on Wednesday and have not had much time to play with it. It is a point and shoot olympus stylus 7030. So far it has been working really great. I had a camera similar to this one before so I already know the basics of it which makes it easier.
zebra minky pink cloud minkee fabric baby blanket with ruffle black and white and pinkI have had this minky fabric for awhile and was saving it for a special project.  I just didn't know what it would be yet!

zebra minky pink cloud minkee fabric baby blanket with ruffle black and white and pinkYesterday I finally bought some satin fabric to do the ruffle. This blanket measures about 30x30 inches. So 30 inches of fabric made 2 blankets (minky measures about 60 wide).

zebra minky pink cloud minkee fabric baby blanket with ruffle black and white and pink
To learn how to make this adorable quilt you can purchase the pattern at A Vision to Remember Shop

Or you can download the pattern for free HERE


How to Sew Fabric Baby Blocks from Scrap Fabrics


Do you have tons of scraps laying around? I know I do. Plus I am always looking for new things to sew for my baby. These baby blocks are a great toy, plus you don't even need a pattern for them.
pattern baby blocks sewing gift simple and quick idea scrap buster project
I have tons of scraps of fabric. I am always looking for ways to use them up. One solution that I have found is to make baby blocks with them.

These blocks are stuffed with a mixture of batting and small fabric scraps (about 1 inch). They are a bit heavier than normal, but that is great for stacking.

pattern baby blocks sewing gift simple and quick idea scrap buster projectMy girls love them. They are constantly playing with them, even though they were made for baby shower gifts.

These blocks are super easy to make. All you do is cut out 6 squares of fabric (these blocks are 6 inches square) I have also done 4 inch ones and they were a great size also. I did a 9 inch square one and it was a bit big.

Then after you have cut them out, sew the squares together to form a block, with the right sides of the fabrics facing each other. I like to sew 3 pieces together in the shape of an L, then repeat with the other 3. Then sew them together. Make sure to leave a small opening so that you can turn the block right side out and then stuff the block with your choice of material.

Have a great day and Happy Sewing

Sweater Dress Upcycle for a Toddler from Womens Shirt

Today, I made my toddler a fun hooded upcycled sweater dress that she has not taken off yet. She is in love with it, and so am I. You all know how much I love to make my girlies clothes. I especially love making them clothes out of clothes that I would normally send to the thrift store.
sweater dress upcycle toddler outfit how to sew childrens clothingThis cute little little dress took me seriously about 15 minutes to make. That included coaxing her to try it on 4 different times.

sweater dress upcycle toddler outfit how to sew childrens clothingThis sweater had a deep V-neck. I had some extra knit fabric that I sewed into the V. I need to add something else at the top. Ruffles, maybe?
sweater dress upcycle toddler outfit how to sew childrens clothingLook at how adorable she is.

sweater dress upcycle toddler outfit how to sew childrens clothingShe is so comfortable in this dress.

sweater dress upcycle toddler outfit how to sew childrens clothingHere is the shirt before I started to sew it. I first had her try it on inside out. Then I pinned where it needed to be taken in (its those yellow dots around the armpit).

Then I just sewed along the pins, cut away the extra fabric. Then I added the knit fabric to the V-Neck.

Seriously. This project took me 15 minutes. Go take a look in your closet. I know there are clothes in there that you do not wear anymore that your kiddies would love to wear. Plus it is really easy on the pocket book.

Ribbon Skirt Tutorial for Girls

Today, I am really excited to be able to share with you a fun little skirt made with ribbon pieces sewn onto the fabric (creating a ribbon fabric) that I made for my daughter.

Ribbon Skirt Tutorial for Girls by A Vision to Remember

Isn't she just adorable?!?
Skirt made from ribbon embellished fabricThis skirt can be as complicated or simple as you would like. All I did was copy a skirt that my daughter has. I made the waist band 4 inches wide.


Ribbon Skirt TutorialIt also has a cute little ruffle
backside of ribbon skirt (includes pattern and how to make the ribbon fabric)The backside of the skirt
2 layer girls skirt with ribbonThe skirt is even made of 2 layers.

Instructions for making the ribbon fabric:

  1. Take the main body part of your skirt and randomly sew ribbon onto the fabric. I used a ton of scrap ribbon that I had from other projects. I sewed on 3 layers of ribbon. The top layer was random small pieces of ribbon that I used steam a seam (1/4 inch) and ironed them onto the fabric so that they would not move while I was sewing them.
  2. The next layer of ribbon I sewed them all in a straight line horizontally.
  3. The third and last layer of ribbon I sewed the ribbon all vertically onto the fabric.
  4. Now between 80-90% of the fabric is covered with ribbon. You don't have to do this much ribbon. If you want, pin the ribbon onto the fabric in the pattern that you are wanting and then sew the ribbon that way.
  5. Now trim off the extra ribbon that is hanging over the edge of the fabric.
  6. Sew the skirt together following the directions for your favorite skirt pattern or follow the direction below:


Cute skirt made from ribbon trimmings


Here is how to make your skirt for a little girl:

  1. Measure the waist of whoever the dress will fit. My daughters is 21 inches.
  2. Divide that number by 2, then add .5 (this is for your seam allowance so add what you need). So now I have 11 inches. This is how long you need your front "yoke" (that is the front part of the waistband)
  3. Now take the other half of the number (21 in my case) which is 10.5 and add 1-2 inches. This is going to be for the back part of the yoke. You want this part to have a little bit of give so that the skirt can stretch over the bootie (or hindy). Then add your seam allowance again. So my new number for the back yoke is 13 inches.
  4. Now decide how tall you want your waistband. I wanted mine 3 inches tall.
  5. For the front yoke take your number and add .5 inches again for the seam allowance. My new number is 3.5
  6. For the back yoke you need to add room for your elastic waistband. So you need to add 1 extra inch (I used 1/2 inch wide elastic). then add .5 for your seam allowance. My new number is 4.5
  7. Now for the skirt part: take your first magic number (21 for me) and double it. So now I have 42.
  8. Now for the height: I wanted to do 2 layers for the skirt and I wanted them to be about 4 inches tall. So to make it easier while sewing the ribbon onto the skirt I did 1 panel and sewed on all the ribbon and then cut that panel into the skirts. So my panel ended up being 10 inches tall (8 for both skirt layers plus .5 and plus .5 twice for the seam allowances)
  9. For the ruffle you take your length for the skirt part and times it by3 it again (my number is 132)
  10. I wanted my ruffle about 2 inches wide (so 2.5 for me)
  11. Now for the cutting part: Cut out 2 front yokes (mine are 3.5x11 inches) and 1 back yoke (13x4.5). Cut your skirt piece (mine was 10x42), Cut your ruffle (I needed 132 inches of 2.5 inch wide strips of fabric so I cut 3 2.5 inch strips out of my fabric and then sewed them into one long strip), and cut a piece of elastic the same length as your waist measurement divided by 2 (in my case it is 10.5
  12. Now sew the 2 front yokes together, turn then, then iron the piece flat.
  13. Take your back yoke and finish the top edge, then turn it over .5 inches and sew it down to create the place for your elastic to be threaded through.
  14. Now take your skirt piece and cut it into the correct sizes (I now have 2 42x4.5 inch pieces.
  15. Sew along the 4.5 inch side to create a circle. Repeat with the 2 skirt piece
  16. Lay the pieces so that the ribbon side is facing you and then sew around the top part of them (the 42 inch side).
  17. Thread the elastic through the back yoke. Make sure to not loose it inside the yoke
  18. Now sew the front and back yoke pieces together to form a circle. Make sure to sew the elastic while you are doing this.
  19. Now sew the ruffle into a circle
  20. Sew the yoke piece to the skirt piece. And then sew the ruffle piece onto the skirt.
  21. Now you have a unique, adorable ribbon skirt.


Let's Get Social

Image HTML map generator


Featured Post

Where Can I Buy Personalized LDS Baptism Gifts Online?