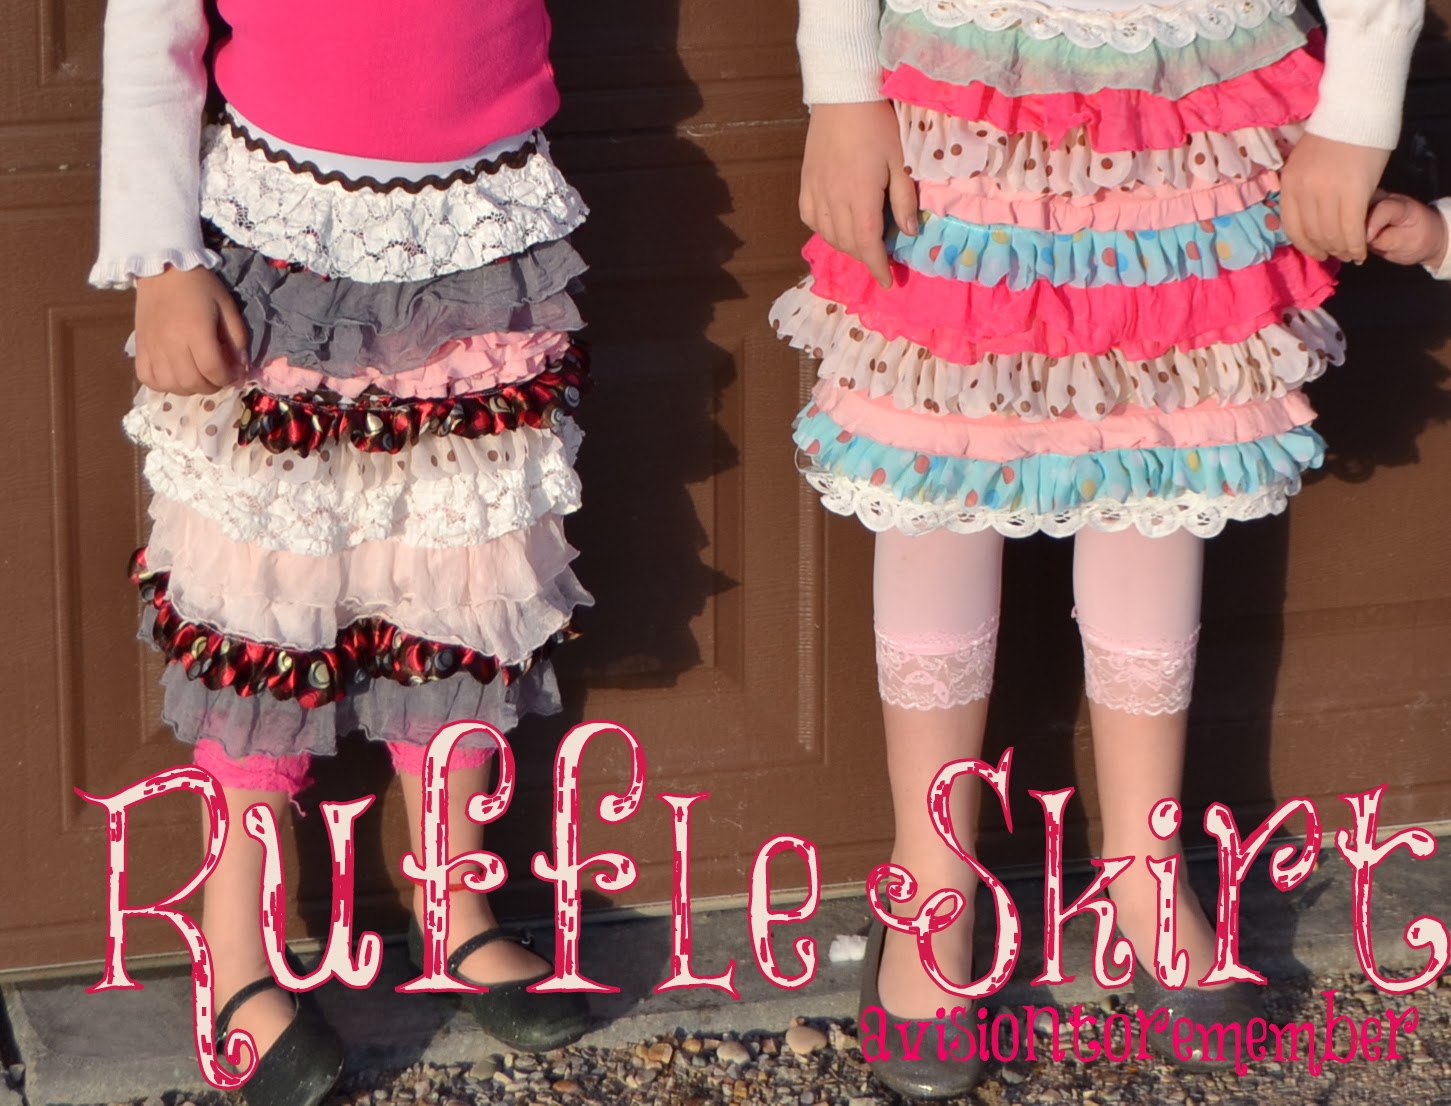
Ruffle Trim Girl Skirts

I love all things ruffle.  Seriously....LOVE.  Especially when those ruffles are on little girls.  There is nothing better in the world. 

Last weekend I caught up on all my etsy orders (which is a first in such a long time it was a weird feeling)  and had promised my 2 older girls that I would make them a skirt.  I didn't know exactly what I would make them, but my drawer of remnant ruffle fabric pieces was over flowing and driving me NUTS!

is it just me or am I the only person that can't get a decent picture of ALL of my children at once.  Oh well.  I can't wait til she is 30 and I can say "check out that temper...all over a cabbage patch doll"

So this was the solution to my problem. I was able to use up some of my remnants and make the girls a cute new skirt.   I also had some ruffle satin trim hanging around in my sewing room from Wholeport.  

SUPPLIES:
~Ruffle fabric pieces cut so that there is only 1 or 2 ruffles on each piece (1 piece would go around the entire skirt once)
 ~Satin Ruffle Trim or lace trim ( 1 yard went around the skirt once)
~cotton fabric for the base (I used a skirt that my girls already had to guesstimate what size it needed to be.  For reference my 7 year olds skirt measured a total of 27 inches around the waist and 25 inches long)
~elastic waist band.  I used 3 inch wide on the larger skirt and 1.5 inch wide for the medium skirt
~ric-rac if desired. 

1.  I used a solid white cotton fabric for the base of my skirts.  Cut your skirt pieces the size desired.  I would make it at least 3 inches wider than your child's measurements and then stretch your elastic to fit the width. That way you know that the skirt will fit your child :)
2. Sew your skirt together down the 2 sides.  I used my serger.  Then I serged/finished the top and the bottom as well .
3.Sew your elastic waistband onto the skirt piece.  I like to do it now instead of after sewing the ruffles on so that you can make sure you get the ruffles as close to the elastic as possible so you don't see the base fabric
4. Mark your rows for going around the skirt.  Normally I wouldn't take the time, but it kept my lines straight and gave me a guide for sewing the ruffles down.  On the larger skirt I marked every 1 inch, on the other 2 I marked every 1.5 inches.  I don't think it matters which one you do.  I didn't end up sewing exactly on the line.  It just depended on how wide the ruffle or trim was that I was using on that row.  But it was really nice to have the markings as a guide to help me keep the rows straight
5.  Now start at the top of your skirt and pick the first fabric you are going to be sewing on.  I sewed as close, or barely on top of the elastic, as I could.  That way the base fabric wasn't visible after sewing.
6. The satin trim is easy to sew on.  Just top stitch it onto your base fabric, keeping it straight with your guide marks.  The ruffle fabric is a little more difficult.  A couple suggestions I have that may help you:
   a. if you are doing 2 ruffle pieces then I would open the ruffle fabric up like in the picture below with the right side facing the base fabric and sew it onto your base fabric.  Then when you are done sewing the fabric will fold over and appear a lot fuller.
  b. I would stuff as much ruffle fabric in while sewing as possible to make it fuller.  The first couple rows I did were not full enough so I ended up going back and adding more fabric there.
c. You could pre-ruffle your ruffle fabric before sewing if you find that easier to keep your ruffling even.  I didn't, I just stuffed and sewed. 

7.  Make sure if you aren't going to be sewing a ruffle onto the very bottom of your base fabric where you serged it to fold it over and finish it nicely.
8.  If you would like to add the ric-rac trim at the top now is the time.  I just top stitched the ric-rac on right at the top edge of the first ruffle.

Thanks so much for stopping by and checking out my tutorial.  If you find it helpful you might consider following along for more great tutorials and information. 


Strawberry French Toast with Coconut Syrup

If you haven't noticed lately, but I am a little obsessed with flavor bread for french toast.  Its one of my family's favorite breakfast.  Especially if it includes whipping cream and fresh fruit.

So today, we tried a bread from Franz called Strawberry Shortcake.  It smelled DI-VINE!  Of course me and my cheap wallet got the bread at the Franz day old bread store.  I did look in our local Fred Meyer and they had the bread too, it was $1 more, but they had it.


Recipe :
1 loaf of Strawberry flavored bread (I personally prefer to use bread that has yeast, it seems to hold together better)
5 eggs
1/2 c almond milk (or regular milk)
1 tsp vanilla extract
Fresh Strawberries
Coconut Syrup (Go HERE for the recipe)
Whipping Cream (from a can or the real stuff)

1. Mix the eggs, milk, and vanilla together.  Beat the eggs really well.
2. Dip each bread slice into your mixture.  Make sure to coat each side well, then place on a griddle.
3. Cook on both sides until light brown
4.  Serve french toast warm with fresh cut strawberries, syrup and whipping cream


Follow Me on Pinterest Follow on Bloglovin

Hot Pink and Aqua Girls Bathroom

My 2 oldest girls (7 and 4) recently asked me if I could get them bunk beds so they could move downstairs together.  Of course I was ELATED, we have been trying to get them to move down for awhile now.

So I finally found me some Craigslist bunkbeds, and they came with a desk and a dresser.  Well, I finally got the furniture all painted, so over the weekend I painted their new bedroom and bathroom.  They are both the tiffany blue walls, with hot pink and white accents.    Their bedroom isn't quite finished yet, I am still waiting on a couple things to come in the mail.  So without further Ado....Here is the big bathroom reveal:

Glass Cupboard to a Picture Display

This is the Picture Display that I shared with on +UCreate blog a few weeks ago.  Thought I would share it with you all in case you missed it.  

Hi!  I am Bobbie and I blog over at I am Only 1 Woman and I have an Etsy Shop called A Vision to Remember.  I am the mom to 3 little girls that keep my life fun and eventful, and maybe even a little dramatic at times!

I love to refinish furniture and recently I redid a china Cabinet to store a little fabric in:


The only problem was I had 2 doors that I no longer needed and didn't know what to do with them for sure, until I had the idea to turn them into a picture display. 


So I went about painting them with my favorite paint sprayer.  I kept the original handles on the cupboards because I love the way they look, but I did spray pain them silver instead of the yucky old brass color.

Then I picked out the pictures that I wanted to use and placed them where I wanted them.

Then I used a few glue dots on each picture to secure the pictures down.

The first time I hung the pictures I used 2 nails and that did the trick for a few weeks until one of my daughters walked by and brushed the frame...Crash!!!  So then I bought some of the Command Strips that are like velcro and stuck those to the back of the frame and they work PERFECTLY! 


I just love how they came out!

Thanks so much Kari for letting me visit your blog! 


Pumpkin French toast


I had a few requests over on Instagram yesterday for the recipe for these pumpkin french toasts.  So here you go:

The recipe below used the entire bag of pumpkin bread.  I like to make a big batch and then freeze what we don't eat.  Then my girls have a quick easy breakfast before school that isn't cold cereal.

Ingredients:
 Pumpkin bread (make sure it is bread that has yeast in it so that it is like sandwich bread and not like banana bread)  This is the bread I used.  Sorry it is upside down.
5 eggs
1/2 c almond milk (or use whatever milk you have I just like almond milk plus it only has 15 calories)
Cinnamon to taste.  We like a lot of cinnamon so I add it couple times after I have covered 4 or 5 pieces of bread, then I sprinkle more cinnamon in the bowl and mix it up a little bit.  Plus the little helpers love to sprinkle it into the bowl.

 
Mix all the ingredients (except for the bread) into a bowl  with a fork.  Make sure your eggs are mixed in really well.  
 
Then take one piece of bread and put it into your bowl of egg mixture.  Coat one side and then the other.  Place the bread on the griddle and then repeat until you griddle is covered.  Flip them as they brown and then serve with your favorite syrup.  We used just regular ol maple syrup but I think that this recipe would be yummy with it (Coconut Syrup Recipe)

Book Review: Sparkle Factory: The design and craft of Tarina's Fashion Jewelry and Accessories

I was asked to review this book a few weeks ago and of course I was excited to check it out because it has one of my favorite words: SPARKLE!  It was definitely filled with lots of eye candy with all the bright and fun pictures.  There are also some great tutorials on how to make fun jewelry.  So make sure to go check it out:  The Sparkle Factory: The Design and Craft of Tarina's Fashion Jewelry and Accessories Follow Me on Pinterest Follow on Bloglovin

50th Classy Birthday Party with a Quick Gift and Quick Cake

Do you need a quick and easy cake decorating idea? I found this on pinterest and got the instructions from this blog (Spiced Blog)
We did a surprise 50th birthday party for my mom. She was surprised but we knew that she wouldn't want to to have all the black and over the hill stuff. So instead we did bling cause she is a classy Lady.
Of course we also had to get her a blinged out "candy cane" as my 4 year old calls it.  We just took a metal can and spray painted it hot pink and then glitter over the top of that.  It was a fun and quick little gift. 

Follow Me on Pinterest Follow on Bloglovin

Book Review: Play-Doh Shapes and Letters Books

I was asked to do a review on 2 different books. I was so excited to check these books out because I knew my girls would LOVE them!


They are the Play-Doh Shapes book


and the Play-Doh Letters book.

They are really fun books because my girls were able to read them and look at the fun bright pictures and then after that then they pulled out the play-doh and played with it.  It was really fun for my 4 year old because she is loves learning and working with letters.  So make sure to check them out!  
 Follow Me on Pinterest Follow on Bloglovin

Let's Get Social

Image HTML map generator


Featured Post

Where Can I Buy Personalized LDS Baptism Gifts Online?