Showing posts with label girl. Show all posts

Woodland Baby Girl Quilts and Nursery Bedding with Deer Heads


These Deer Quilts are killing me!  In a good way.  I love them.

Seriously!

I can't decide which is my favorite!

So can you help me decide which of these girly quilts is your favorite?!

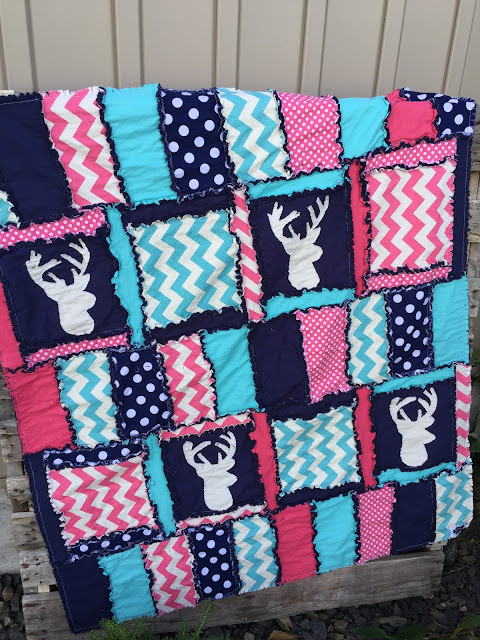
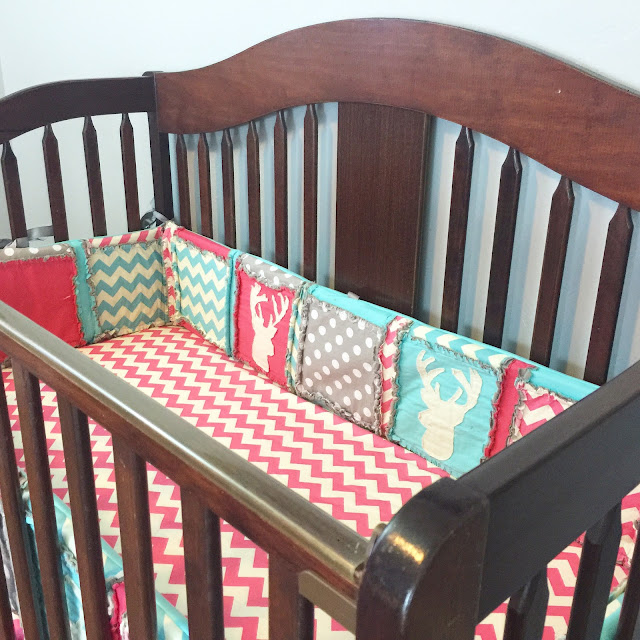
A.  The Hot Pink, Turquoise, and Aqua Deer Quilt for Woodland Baby Bedding


Baby Girl Crib Bedding Navy, Aqua, PinkGirl Crib Bedding and Car Seat Canopy

B. Lime Green, Navy Blue, Aqua, and Gray Woodland Baby Quilt and Nursery Crib Bedding

Lime Green, Navy Blue, Aqua, and Gray Woodland Baby Quilt and Nursery Crib Bedding
Girl Rag Quilt with Deer Silhoette for Baby Girl or Boy
Deer Baby Quilt for Lady Hunter

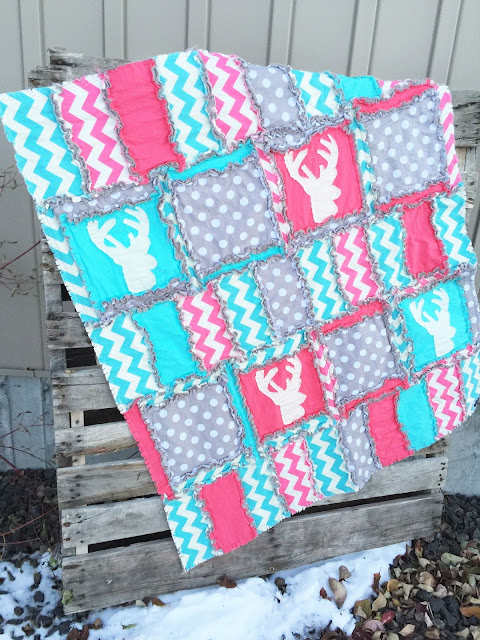
 C The Hot Pink, Aqua, and Gray Baby Girl Crib Bedding with Deer Heads for a Woodland Theme Nursery


Baby Girl Crib Bedding Nursery Deer, Aqua, Gray, Pink

Woodland Baby Girl Crib Bedding with Deer Silhouettes in Pink, Aqua, and Gray

Woodland Car Seat Canopy Deer Aqua, Gray, and Hot Pink

Deer Baby Quilts in Aqua, Hot Pink, and Gray Woodland


Check out the video and make sure to add your decision below in the comments....A, B, C, or D 


Image HTML map generator

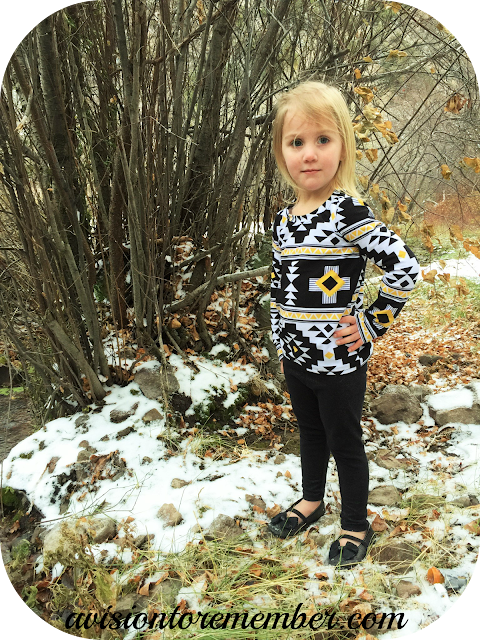
Top Stitchers Aztec Print Christmas Dress

I am so excited to share with you my entry for the Top Stitchers Head to Head competition.  Just like last season, it was a little scary, a lot of knots in my tummy, and a lot more apprehension!


  I thought my prompt was all about Christmas…So, a couple Mondays ago, when it started to snow, I knew I was on a limited amount of time to get this baby from fabric to dress.

So after a mad dash to get the pattern printed, taped, cut, I was off the to machine.  Serging away at the dress.  Then, just as I was finishing up the dress, I looked outside and saw that all the snow that had fallen in the last couple of hours, had disappeared and there was no snow in the forecast the rest of the week!

That’s Idaho for you! 

 I have a feeling that if Idaho was a person, they would be bipolar.  Snow and cold one minute, and summer the next.  It is what it is, and I still love and live here…
After being bummed for 2.5 seconds, we dashed into action.  Grabbed a “few” photo props and jumped in the car, in search for some snow.

Off we drove to the nearby-ish hills.  Daylight was quickly leaving.  Finally, near the ski hill that is 30 minutes away from our house, we found a small patch of snow.  It wasn’t much, but it would do.

We set up a few things and started to snag a few pictures, when the DSLR camera decided it was time for a nap.  Unlucky for me, I hadn’t charged the camera.  '

 Silly me….Who needs a camera when they drive clear to the ski hill to get a few photos?


Thankfully, I had a backup phone camera that did the trick while we were there

 {who am I kidding, my phone never leaves my side, unless I misplace it for a few minutes}.

 Poor girl was freezing her hiney off, while I bossed her around.  I think this will be a trip all 3 girls remember for a long time 

{hopefully because it was fun and spur of the moment-not because I’m crazy…}

While there we discovered this beautiful rock wall and little stream, with lots of green all around.  And I’m not joking when I say that I was hoping to encounter any wildlife of any kind while there (I mean bears are really not my cup o’ tea)

Then off to home and to find some hot chocolate.


Now, remember how I told you that if Idaho was a person they would be bipolar.  The person would also be a woman, because Idaho can never make up her mind. 

The week proceeded like usual, until Thursday morning when I realized that it was…..

you guessed it….

SNOWING.

Not snowing a couple of flakes, but REALLY snowing.   

{yep, indecisive}


As soon as the girls got off the bus, Addy was instructed to “get dressed again, we’re going to the hay field behind the house and taking a few more pictures”.

I’m so glad that my 6 year old girl is such a good sport when bribed with hot chocolate.  I packed her through the backyard to the field behind our house and took a few more pictures. 

And that my friends, is how we got to where we are.  
With that all being said, make sure to stop by the Sewing Stadium: Top Stitchers post where I slaughter a remix of The Night Before Christmas Poem.

Also, I would love for you to check out, and give me your score!

A few of the details:


I used the Bluezette Dress Pattern by Love Notions and paired it with Riley Blakes beautiful knit print from their 4 Corners line that Simple Simon and Co created.  

The vest I just cut and cut and sewed until it fit.  I'll have the pattern for you all later on this week...or at least how you can make your own, no matter the size.  


Image HTML map generator

Aztec Toddler Girl Shirt Pattern by Muse of the Morning {Practically Perfect Girls Shirt Pattern}

I am so excited to share this with you all!  A little over a month ago I joined up with several other pattern designers and swapped patterns.  I was so lucky to be able to try out the Practically Perfect Girls Shirt Pattern by Muse of the Morning. 

Aztec Little Girl Shirt Pattern
If that isn't sass...I don't know what is. 


The Daily Grind and a Girl Baby Blanket in Brown, Green, and Salmon Pink

It's been one of those weeks.  You know the kind.  It goes something like this:

1. Get up REALLY early.  Ok, just kidding...Wake Up at 5:30 am.  Lay in bed and take a 1/2 hour to talk yourself into working out.
avtrboutique baby blanket for girl

Patchwork Maxi Skirt Tutorial for Women and Girls

I have a hard time throwing away scraps of fabric. In this case, I made 5 or 6 maxi skirts for my sisters and sister in laws last year. After making them I had a bunch of larger scraps of this really soft and comfy chevron knit fabric (its from +Riley Blake ).

I've been saving them for all that time thinking I would be able to make at least a couple of smaller maxi skirts. I wasn't sure how it would work out, but yesterday morning before church I thought I would give it a try

Patchwork Maxi Skirt Tutorial for Women and Girls

Ruffle Flower Rag Quilt for a Toddler Bed or Crib Quilt in Hot Pink, Orange, Yellow, Purple, and Lime Green

One of the latest quilt finishes
This quilt has got to be one of my all time favorites. 
Ruffle Flower Rag Quilt for a Toddler Bed or Crib Quilt in Hot Pink, Orange, Yellow, Purple, and Lime Green
I adore the bright colors, the fluffy, ruffly, flowers.  Seriously.  Makes me weak in the knees

Ruffle Flower Rag Quilt for a Toddler Bed or Crib Quilt in Hot Pink, Orange, Yellow, Purple, and Lime Green

You can make your own with this Free Pattern or I can make one for you. 


Plus, a little work in process pic.  I just adore those flowers!

Ruffle Flower Crib Quilt and Bumpers Set in Hot Pink, Turquoise, Lime Green and Orange

I just adore making crib sets. They are the cutest!


They can't get any cuter.  Bows. Ruffle Flowers.  Bright Colors.

Can I say I am in love and having a hard time sending this set to its new home?

Ruffle Flower Crib Quilt and Bumpers Set in Hot Pink, Turquoise, Lime Green and Orange

This has got to be one of my newest favorite quilt sets.  Hot Pink.  Turquoise.  Yellow. Oh My! 

Ruffle Flower Crib Quilt and Bumpers Set in Hot Pink, Turquoise, Lime Green and Orange

So stinking cute!

I just adore the little lace doilies in the squares.  Making this quilt and bumpers set even more girly.  If that is possible!


Quilt can be found HERE
Bumpers can be Found HERE


Geeky 3 Tier Ruffle Girls Skirt

It was my intention of getting this tiered ruffle skirt tutorial up WAY before back to school season. Here I am, an entire month later, writing up the pattern. Gah! Seriously, the last 2 months have kicked my butt. Not Gonna Lie! But I am so grateful for my new little boy that has joined our family, and that I feel good enough to sit down and write a little. So here the tutorial/pattern goes.


To start off with.  The daughter that I made this skirt for is a tall, skinny, Kindergartener.  She just turned 5.  In ready to wear she wears a size 4 or 5.

To start I took a coordinating fabric and cut it in a trapezoid shape.  The bottom 17 inches wide and the top 12 inches wide.  To get the top measurement I measured her waist (23 inches for her) and added an inch for seam allowance.  I wish that I would have made it 2-3 inches wider so that it would still fit her next summer, but I didn't think about it until after I had sewn it all together.  The length for her was 13 inches.


Sew (or serger) down the long sides of the skirt.  Then fold over the top by and inch and sew it down, make sure to leave an opening so that you can thread your elastic through it.

Serge the bottom edge to get a nice clean finished bottom.

Then I picked out 3 fabrics for the tiers (I used the turquoise and cream dots,  the purple geekly chic glasses fabric, and the cream geekly chic glasses fabric all are made by +Riley Blake )

I cut my strips for the skirt 6 inches wide. I cut 1 for each tier.  To know how much you are going to need plan on 1.5 to 2 times more width than your skirt (this is a good rule of thumb for most ruffling).  The fabric is 44 inches wide so it ended up being almost 2 times the width.

Sew the short ends together. 


Finish off the bottom end of the fabric however you like with a pretty little hem.  I did a rolled hem using my serger.  

Then ruffle your tiers using your favorite method.  This time I used a ruffler foot attachment to my sewing machine, but you could use the kite string method, or elastic thread, or the "shove the fabric under the foot and guess as you go" method.  Whatever suits your fancy. 


Now take your base skirt piece and your first tier for your skirt.  Sew the first tier at the base of the elastic waist seam, making sure to not sew over that seam, but as close as you can get.  Sew it down on the wrong side, with the tier pointing to the top of the skirt.  That way it will hide your unfinished edge under the first tier


Now take a fabric marker and measure down 5 inches from your unfinished edge of your top tier and mark a straight line all the way around your skirt.  Now sew your middle tier down using the same method from above. 


Repeat again with the bottom tier. You should be sewing the bottom tier on about an inch above the bottom hem of the skirt.
Now you have a beautiful tiered skirt that your daughter will be sure to love. 

Hot Pink and Turquoise Girls Bedroom

I don't know if you remember. It was so long ago, but last fall we decided to move the 2 older girls downstairs.  They were so excited to get to sleep in the basement and on BUNKBEDS!  So after searching Craigslist, facebook groups, and thrift stores I finally found these wooden bunk beds, a dresser (that isn't in their room), and a desk.  
I was so excited.  I got to work painting everything with a little help (wink, wink)

Notice the cute little Owl on the bottom bunk.  The pattern can be found here, plus its free!


Room Before Picture.  Lovely Beige Walls. 


I  *finally* got the curtains done, and convinced the girls to clean up their room so that I could take pictures.  But in all seriousness.  The convincing included me throwing everything that was not photographable out into the hall with instructions to clean it up.  Mean mom....I know. 

Love the curtains, and so do the girls!  PS If you want your own curtain similar you can head on over to my Etsy Shop


This dresser I had my parents pick up a couple years ago from Craigslist in Arizona.  I am so jealous of their Craigslist.  Idaho Craigslist is definitely lacking to say the least.

I even let my oldest keep her "participation" trophy's out.  Even though I still don't understand why people give out participation trophy's.  Dumbest thing ever!


Even Minnie was able to make her debut.

Oh and the cute little metal chair came with the bunkbed set.  The person I bought them from didn't have a need for the chair anymore.  It was ugly, and boyish blue, with lovely boy stickers all over it.  Thanks to my awesome F-I-L, all that crap was burned off and then the chair got a lovely powder coat for a little bit extra durability. 

For those of you that follow along with me you might remember that I also redid their bathroom to match their bedroom.  Go HERE for a little pic
 Follow on Bloglovin

Scallop Seaside Shorts Pattern Review

I had the opportunity test the Seaside Scallop Shorts by Peek-a-Boo Pattern Shop over the weekend. 
I was so excited to finally be picked to test one of Amy's patterns.  I have several of them and love Ever Single One of Them! 
This pattern did not disappoint.  (neither did my little girl during our mini photo shoot)  She cracks me up!

So if you would like to buy your own pattern it is on sale for 15% off today for its release.

So head on over and get your pattern today!  

Subscribe

Enter your email address:

Delivered by FeedBurner

Let's Get Social

Image HTML map generator