Showing posts with label sewing. Show all posts

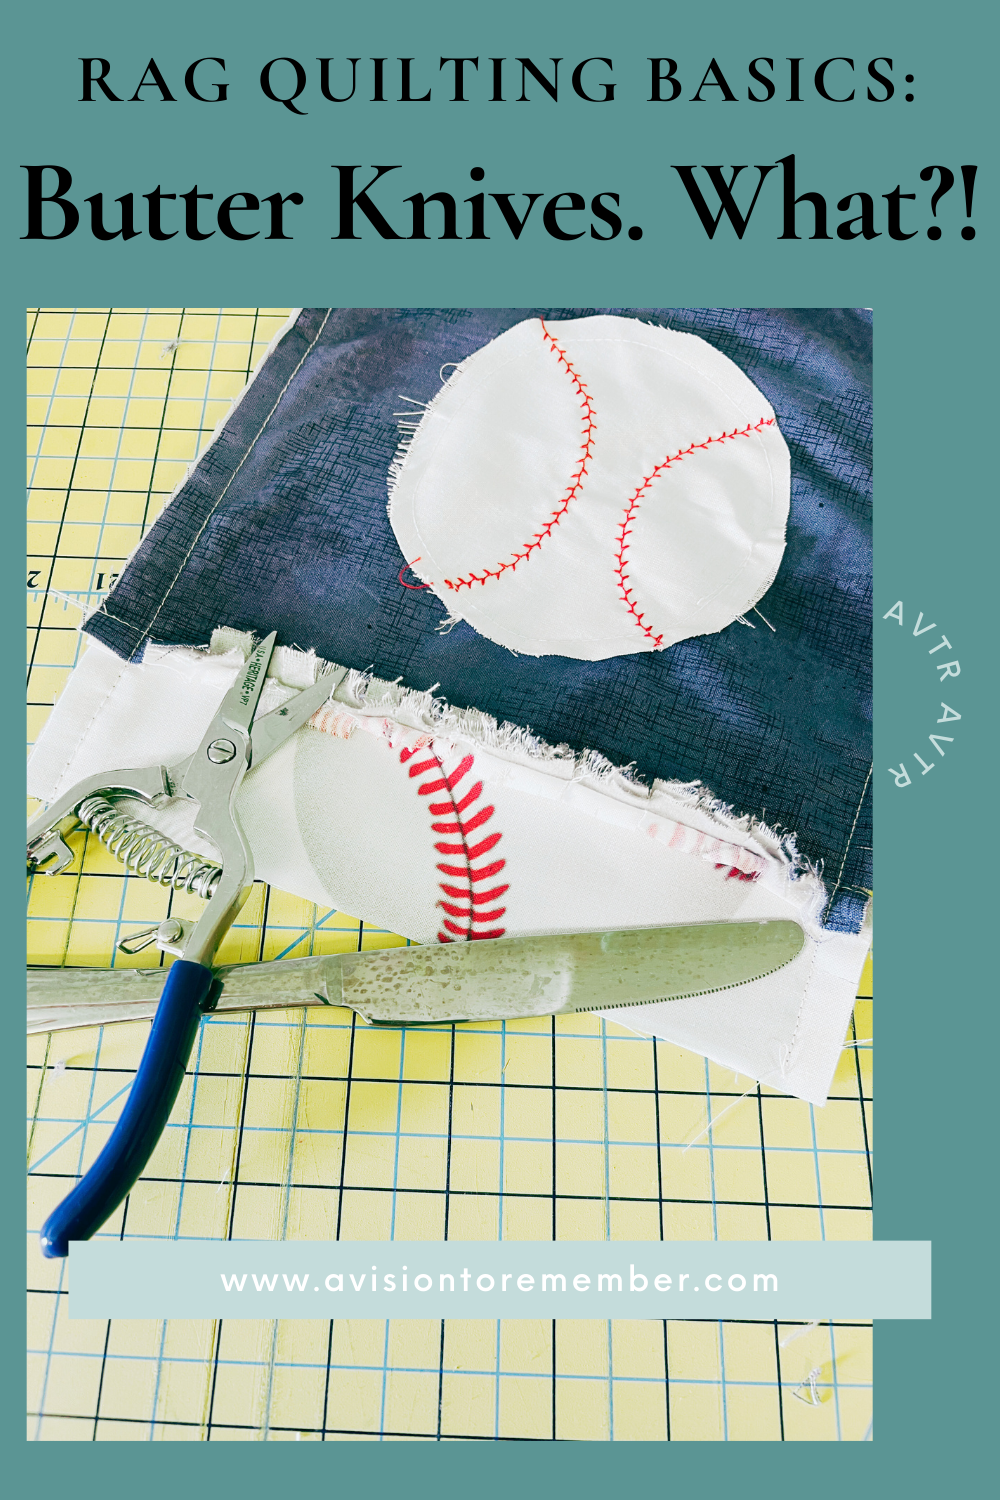
Using a Butter Knife While Making a Quilt? Weird...Nope!

Rag quilts are a popular style of quilt that feature exposed seams that are frayed to create a soft and cozy texture. While many quilters choose to fray the edges of their rag quilts by washing and drying them multiple times, there is another method that can be just as effective: using a butter knife.


Here's how to use a butter knife to fray the edges of a rag quilt:

  1. Start by clipping the edges of the quilt so that they are all even.

  2. Take a butter knife and run the blade along the edge of the quilt, pressing down firmly as you go. The goal is to loosen the weave of the fabric so that it will fray easily.

  3. Once you have run the butter knife along the entire length of the edge, use your fingers to gently pull the loose threads away from the quilt. You may need to go over the edge with the butter knife a few more times to get all of the threads to loosen.

  4. Repeat this process on all four sides of the quilt until you have the desired amount of fraying.

    Watch as we butter knife a quilt block over on our youtube channel

One advantage of using a butter knife to fray the edges of a rag quilt is that it allows you to have more control over the amount of fraying that occurs. With washing and drying, it can be difficult to predict exactly how much the quilt will fray, but with the butter knife method, you can choose to fray the edges as much or as little as you like.

Also, if you miss clipping a seam, and notice after washing, just use the butter knife instead of laundering again. 

Another advantage is that it can be quicker than laundering the quilt multiple times. While laundering the quilt is certainly effective, it can be time-consuming and may take several cycles to get the desired amount of fraying.

In conclusion, using a butter knife to fray the edges of a rag quilt is a simple and effective  

Check out more sewing tips on our blog

  Image HTML map generator

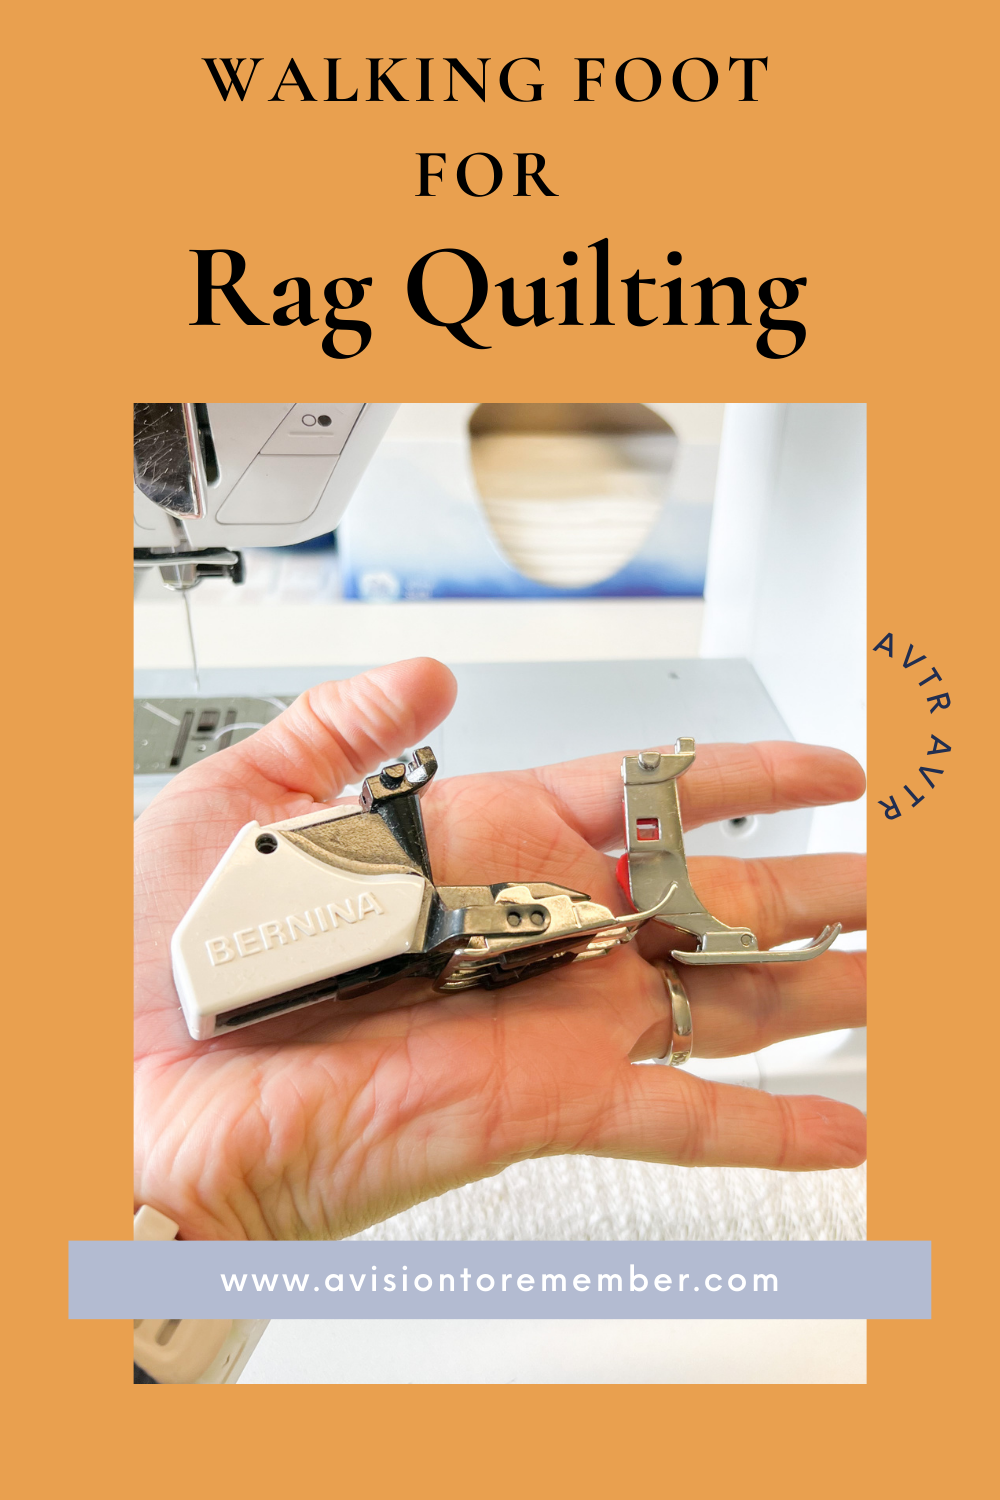
Should You Use a Walking Foot to Sew a Rag Quilt?


I often receive this question: Should I use a walking foot to sew a rag quilt? 

{affiliate links included in blog post. Thanks for your support!}

Sadly, and like most things in life, its not a cut and dry answer.

There are several factors that run into my decision, and possibly yours, when choosing a walking foot over a regular sewing machine foot. 

Fabric chosen for rag quilt

If I am using cotton or flannel fabrics only, I opt to use a regular sewing machine foot. If I am using minky fabric, then I always use a walking foot. Cotton and flannel don't have a lot of natural stretch to the fabric, and minky is very stretchy and slick. The walking foot helps the fabric move through evenly

Machine used to sew rag quilt 

If I am sewing on my industrial Juki DDL 8700 I don't have a choice. No walking foot for me. If I am looking for speed and a better quality stitch then I am using the Juki. 

Seam Allowance on rag quilt


Using a 1/2 inch seam allowance is kinda annoying with a walking foot. The foot is wider and it seems to grab the fabric and fold it over as I am going. So often I get frustrated and switch back to my regular foot. Not all sewing machine feet are the exact same width. This may  not be an issue with your machine or where you're comfortable with your seam allowance on your rag quilt

In conclusion, it really is a personal preference whether a walking foot is for you or not. And just like most things in rag quilting, there really isn't a right or wrong way to do things. 

Give the walking foot a quick go, if you like it, keep it! No harm in trying

How to Sew Using Large Thread Cones at Home-

(affiliate links below)


If you love sewing and are looking to complete large projects, use the same color of thread often, or are going to start a business or have a small home business, buying large cones at home can be more economical than purchasing smaller packages. Make sure you use quality thread so that it lasts longer. We love our cone tower from Amazon because it is metal so it won't break easily if you move your machine, take it to classes or put away. 

If you're interested in sewing, you probably already know that thread is a huge part of any successful project. The right thread can be the difference between an average-looking garment and one that really stands out! We sew the most with gray, white, and black.

Using a cone tower makes it possible to use large cones on sewing machines at home

We love this cone tower on amazon. The base is metal, and the stand is also metal. So it doesn't easily break.

We have used a plastic on in the past and if you ever move your machine, put it away, or take it to classes, I would definitely not recommend it. However it is a lot cheaper and lighter.


We recommend only purchasing cones if you will use them. Thread will break down overtime, several years. But if it is quality thread, it takes a lot longer. Investing in better thread will make a huge difference.

We have bought many different brands and types of thread over the years, some haven't held up and break easily and others are still great to sew with after 12 years of sewing.


Image HTML map generator

Ruffle Pillow Sham Tutorial

Unique bedding and home decor items are our specialty. 

Plus, we love plaid. 

Do you?

We wanted some pillow shams that were a little shabby, a little chic, to go with our farmhouse decor

I love how they turned out.

You can purchase them in our shop

We offer them in a wide variety of colors and sizes. 

But you're looking to make your own, follow along with the video below.


Image HTML map generator

How to Thread a Needle Easily

Did you know 
...
That needles have a front and back?

I didn't either.

But they do. 


Watch as we easily thread a needle. 


One last thing...

Get the needle eye wet (a little spit didn't hurt any needle)

It will help so much!Image HTML map generator

How to Thread a Juki DDL-8700 Sewing Machine

When I first began sewing rag quilts for a living, I went through so many needles. I could have bought stock in Schmetz!

No joke! 

I bought the thickest needles I could find in my local big box craft stores. The typical Universal 90/14.

But I still broke needles. 

Every time I broke a needle I would:

  1. Stop sewing (duh)
  2. Change needle
  3. Clean out anywhere the broken part of the needle could have ended up
  4. Checked the seam in the quilt for any remnants of needle.
  5. Began sewing again

This process could take several minutes each time. I knew exactly where I would break the needles (always where 4 seams would cross at). Rag quilts can be bulky to sew through as they are made by sewing quilt back, flannel batting, and quilt top together at the same time. So where seams would meet I could be sewing through 6 layers of fabric, 4 of which were flannel. That is a lot of material! 

So after a few years, and many quilts later, we decided to add to my sewing machine collection and get a Juki DDL 8700. 

We picked it for several reasons. But I am guessing that if you are trying to figure out how to thread the darn thing like I did when I first bought it, you already know you need it.

Once you figure it out, it is really easy to rethread and takes just a second

Follow the video below and you'll be set in no time!


 Image HTML map generator

How to Wash a Rag Quilt

Want to make your own? Get the pattern!
My step-by-step rag quilt patterns take the guesswork out of it — perfect for making your own.
Shop Rag Quilt Patterns »

Washing a rag quilt can be so daunting. If you've heard the horror stories, then you've heard that washing machines have been destroyed. Dryers have burned to the ground. Laundromats have banned all rag quilts.


(all the above are EXAGGERATIONS! and a bit silly)

But, in reality rag quilts shed.  A lot! 

But we have come up with a few simple steps to help with the shredded lint. 

  1. Give your quilt a quick shake before throwing it in the wash.This will get rid of the fibers already falling off. I would make sure to shake it somewhere you don't care if you end up with flying fibers. Outside, in a garage, in the living room followed by a quick vacuum. Whatever works for you
  2. Throw it in the washer with other things. I like to wash with towels. I also like to do a rinse only to start with. Just to get the quilt wet. This also helps with clogging the drain pipe. You'll remove most of the fibers in the dryer.
  3. Throw it in the dryer with wool dryer balls and a couple towels. The balls and towels help to remove more of the lint and to catch it as well.
  4. Check your lint catcher OFTEN. In a 60 minute dry time I check 2-3 times. More if its a big quilt.
  5. Use a lint roller to clean up the quilt after washing and drying.
  6. Rewash quilt if you want to wash with detergent, followed by another dry time. 
  7. After 2-3 wash/dry cycles your quilt shouldn't shed too much anymore. 

I often am asked if the quilt will shed past the sewing and the blanket fall apart. I personally use this quilt daily, and have for almost 10 years. I love it. I even added minky to the back of the quilt so its perfect all winter in cold snowy Idaho. It is still going strong. No holes. No falling apart. 

There may be types of fabric that will shred past the sewing, but I wouldn't recommend using it in the first place. It is most likely a very thin or loosely woven fabric to begin with. But in making rag quilts since 2009 professionally, I haven't had a quilt fall apart due to shredding past the seam


How to Make a Rag Quilt with Batting

Want to make your own? Get the pattern!
My step-by-step rag quilt patterns take the guesswork out of it — perfect for making your own.
Shop Rag Quilt Patterns »

Typical quilts are made by first creating a quilt top, then by making a quilt sandwich that includes the quilt top, batting, and backing. Rag quilting short cuts the quilt top assembly and creates the quilt top while sewing the backing and batting pieces at the same time.

You have several different options for the middle layer.

Warm and Natural Batting

Warm and Natural batting will give your quilt a really nice weight. If you choose to use this as your middle layer, you will need to cut the batting pieces 1'' smaller than the bottom and top layers so that the batting doesn't show in the exposed seams on the top of the quilt.

You will not be able to use batting for patterns like the Flying Geese, the Hourglass Pillow, or the Arrow Quilt because as you are assembling your quilt you will be cutting sewn pieces, and then sewing them again. Your batting would show in the exposed seams.

Diamond Rag Quilt Pattern by A Vision to Remember
Arrow Rag Quilt Pattern by A Vision to RememberRoadways rag quilt pattern by avisiontoremember

If you use Warm and Natural for your middle layer, you must quilt each and every one of your fabric sandwiches. If you don't, the batting will move around and ball up in your quilt when it is washed. One easy way to quilt the sandwiches is to sew an X in the sandwich from point to point. But you can quilt the block using any quilting technique.

Examples of sewing squares together before sewing the quilt together: 

X from corner to corner


Quilting like on a quilt over entire block 


Straight line quilting

Flannel Fabric for Rag Quilt Batting

For the middle layers in my quilts, I prefer a coordinating layer of flannel. The flannel will add color to your quilt in the exposed seams, while still adding weight.

Cut the middle layer the same size as the bottom layer. This middle layer works well for the quilt assembly method where pieces are sewn together and then cut to make different shaped blocks. Quilts like Flying Geese, the Hourglass Pillow, or the Arrow Quilt will be perfect for flannel middle layers.

Rail Fence Rag Quilt Pattern by A Vision to Remember

Another reason I prefer flannel for the middle layer is that it keeps the cost of the quilt down. Flannel costs about half as much as Warm and Natural batting.

Below is a quilt I made with black flannel batting, red flannel back, and kids pajamas as the top of the quilt. I loved how it turned out.  It was very warm and snuggly!


 I used the easy peasy rag quilt pattern for the above quilt. It can be found in our rag quilt pattern shop on etsy.


  Image HTML map generator

Rag Quilt Seam Allowance

Want to make your own? Get the pattern!
My step-by-step rag quilt patterns take the guesswork out of it — perfect for making your own.
Shop Rag Quilt Patterns »

Seam allowances and rag quilts are a funny topic among avid rag quilters. There really is no right or wrong answer when it comes to answering this age old questions.  But there might be a right answer for you!


Let me help you decide which seam allowance is best for you.   

 Rag Quilt Seam Allowance 1/2 inch 

How to Determine the Best Rag Quilt Seam Allowance

  1.  Fluffiniess vs hiding fabric - the width of the exposed seam allowance will partially cover up the fabric underneath it. But rag quilts are also known for the fluffy exposed seams. If using a small block, reduce the width of the exposed seam (the seam allowance) to allow for the block to be more visible (for example a 5 inch block with a 1 inch seam allowance will only show about 3 inches of the block. Versus a 5 inch block with a 1/2 inch seam allowance will show 4 inches of the block)
  2. Clipping the Seams - the width of the clipped seams also lends to the how fluffy the exposed seam is. Clip 1/8th inch apart from each other for a very ragged effect, or clip 1/4 inch apart as the picture above is. 
  3. Type of Fabric - if using 100% cotton fabric, the exposed seam will really fluff up a lot. Cotton frays, which is exactly what is wanted for rag quilts. A wider seam allowance will be great with 100% cotton fabrics. If using polyester, minky, or other fabrics that don't fray as well, a smaller seam allowance will be best. 

I personally use (and prefer) a 1/2 inch seam allowance. Especially because of the skinny rectangles I most often use in quilts. It allows for more of the rectangle to be visible. 

I also prefer it over a wider one, as that is the perfect width for the scissors that I use to easily open up to, the clip the next spot. 

These are the scissors I personally prefer (and a post about all the ones I have tried)

In 2021 alone, I sewed and clipped over 200 quilts for A Vision to Remember (also known as avtrboutique.com)
For all of the majority of those quilts, I used the Easy Peasy Rag Quilt pattern with a 1/2 inch seam allowance.


I also use a simple little straight edge magnet and place it on my seam allowance line on the plate on the sewing machine.  This helps me to create a consistent seam allowance every single time without guessing. I have also used this little trick with my 13 year old that has become a wonderful seamstress. Check out these magnetic seam allowance guides on amazon

 Check out all of our Rag Quilting Basics here on our blog!

As always, please let us know if you have any questions by emailing me at Bobbie@avisiontoremember.com


Image HTML map generator

Flannel Rag Quilt Without Batting (Cozy & Easy)

Want to make your own? Get the pattern!
My step-by-step rag quilt patterns take the guesswork out of it — perfect for making your own.
Shop Rag Quilt Patterns »

A Vision to Remember got its start with creating rag quilts. We've been doing it for over 12 years. Many more if you count that my first quilt that I made was while I was in junior high!

We've sewn many quilts with batting and many quilts without batting. 


Easy Peasy Rag Quilt Pattern


The vast majority of quilts we sell in our shop are made without batting. But for those that are looking for batting, look no further! We did an entire blog post about making rag quilts with batting and how to choose the type of batting to be used. 

But for those of you looking for a flannel rag quilt without batting, we've got you covered. These are our favorite types of rag quilts. But first let me give you a lowdown on our process.

Sports Rag Quilt Pattern

We typically use a mixture of cottons and flannels for the fronts of quilts. It is so hard to find the prints we want in flannel fabrics. So we use a quilting cottons if we are unable to find the flannel print we're on the hunt for. But every single quilt we make has flannel in it. Without the flannel the exposed seams would just not be..well...fluffy!

Easy Peasy Rag Quilt Pattern


That's the entire reason for making a rag quilt, right?! We're looking for the cozy fluffy seams

When making a flannel rag quilt without batting we stick to 2 layers of fabric. The top, as we mentioned, is a combination of flannels and cottons, and the back is solid flannel fabric. This is the case for us 99% of the time.

Easy Peasy Rag Quilt Pattern


As always, leave a comment or email us with questions about all thing rag quilting!

Bobbie@avisiontoremember.com


  Image HTML map generator

Best Fabric for Rag Quilts: Flannel, Cotton & More

Want to make your own? Get the pattern!
My step-by-step rag quilt patterns take the guesswork out of it — perfect for making your own.
Shop Rag Quilt Patterns »

The type of fabric you choose for your rag quilt is very important. The frayed edges, and washing the quilt AFTER you’ve assembled and BEFORE using it, make rag quilting very unique. So here are a few tips on choosing the right fabrics, and why. 


To choose the best fabrics for rag quilts, or to see if you have the right fabrics for your rag quilts here are a few characteristics of good rag quilt material: 

100 percent cotton. Cotton fabric frays. Polyester fabric does not. If you want your exposed seams to fray and get really fluffy, then you will want to choose 100 percent cotton fabrics. How do you know if the fabric is 100 percent or not? Look at the top of the bolt for the fabric content. If it says 100 percent cotton, you are good to go. If you love a fabric that is not 100 percent cotton, it will be ok! But keep in mind that wherever that fabric is in your quilt, it will not fray. The flannel underneath it, and the cotton fabrics surrounding it, will all fray and get really fluffy. But the non-cotton fabrics, especially polyester, will not. This includes Minky, fleece, and broadcloth fabrics. They will not fray at all, but if you don’t mind that your exposed seams are not fluffy, then go ahead and use these fabrics. If you REALLY want a Minky back to the quilt, check out the best method for adding one. 

Softness. When I am snuggled up under a quilt, I want it to be soft and cuddly. When choosing fabric in your local quilt shop, make sure to get a feel for the fabric, and not just the looks of it.

 • Colorfast fabric. I can’t tell you how many quilts I have ruined over the years because I bought a cheap fabric, thinking I needed to save a buck, then saw that one fabric bleed into all my other fabrics after my beautiful quilt was sewn together and washed. Red fabrics are the worst! But I will tell you my little secret for avoiding the dreaded fabric bleed: Buy designer fabrics. Riley Blake is my favorite, but you can also use Cloud 9, Moda, Art Gallery, Windam Fabrics, Robert Kaufman and others. They are all amazing quality, but more important, when I’ve used these fabrics, they have never bled. Not once. 

If you are shopping in a big box store and find the fabric that you can’t live without, give that fabric a couple of good prewashes before you put it in the quilt. After the quilt is finished, throw in a color catcher when you wash it, especially the first two or three times. 


 • Flannel or cotton? Contrary to popular belief, flannel fabric is not the only fabric one can use to make a rag quilt. Flannel frays amazingly well, but quilting cottons also fray pretty darn well too.
For all of my rag quilt tops, I use a combination of flannels and cotton fabrics for the top layer of the rag quilt. I actually prefer to use only cotton fabrics for the tops of rag quilts. Flannel fabrics that have designs on them seem to look dull after a few washes, and begin to look not as bright as the rest of the cotton fabrics in the top of the quilt. I’ve seen flannel fabrics (especially discount flannel fabrics) begin to look very worn after being washed only a handful of times. After putting in all that time and money to make a beautiful quilt, I would get discouraged if the quilt began to look old after using it only a couple of times. So I try to stick with quilting cottons for the top of the quilt.

For the back of the quilt, I use solid flannels. I’ve found that the majority of the time, even inexpensive solid flannels hold their colors and don’t fray or peel as much as the flannel prints. Plus, flannel solids are available in a huge assortment of every color of the rainbow, with many colors in between. My absolute favorite brand is Robert Kaufman for flannel solids and we carry them in our online fabric shop.


• Quality. I am sure you’ve heard a million times that it is best to buy designer fabrics from your favorite quilt shop. I tend to lean to this opinion. I have made so many quilts over the years, and the quilts with the designer fabrics from the brands we all know and love have held up the best.
But, I have also found some very beautiful, quality fabrics at the big box stores, and these also have held up through the years. When you are choosing fabrics, take time to run each fabric through your fingers and make sure it feels nice. Look at how tight the weave is; if it is loose it will not hold up very well. Hold the fabric up to see how well it drapes. If it is really stiff and doesn’t drape well, then it probably will not be comfortable to snuggle up with.


Choosing the right fabrics for your rag quilt is very important if you want a long lasting quilt to treasure for yourself or to give to a special person, especially when you put so much time, effort, and money into making such a unique and beautiful quilt. 

Make sure to check out all of the rag quilting resources on our blog, including which scissors to choose, walking feet, how to wash a rag quilt, rag quilting seam allowances, a wide variety of quilt patterns, and more!

Image HTML map generator

Quilt - As - You - Go Car Seat Canopy Pattern

Protecting my newborn baby has always been an upmost priority. Especially from prying eyes when we are out in public.

Que, the simplest Quilt as you Go Car seat Canopy pattern out there!


Isn't this quilt just to die for?


Quilt Features:
  • Finished Quilt measures 33x44" (quilt size can easily be changed by adding more strips)
  • The quilt can be used as a car seat canopy OR a quilt!  Simply don't add the handles and you have the perfect baby quilt
  • The quickest quilt out there....for sure!  Its quilted as you, so its even quicker!
Quilt Requirements:
  • 1 Yard of Fabric for the front of the quilt (can be split between 2-5 fabrics)
  • 1 Yard of Fabric for the back of the quilt
  • 1 Yard of Batting
  • 1/2 Yard for Binding


The quilt pattern is available HERE  Make sure to download it today!


Image HTML map generator

Easy Diaper Stacker Sewing Pattern - Rag Quilt Style

I don't know about you, but keeping my nursery tidy and clean after having baby seems nearly impossible.  This Easy Diaper Stacker Sewing Pattern will help you keep your nursery just a little bit cleaner by keeping all your diapers in one place!

Easy Diaper Stacker Sewing Pattern

Aztec Toddler Girl Shirt Pattern by Muse of the Morning {Practically Perfect Girls Shirt Pattern}

I am so excited to share this with you all!  A little over a month ago I joined up with several other pattern designers and swapped patterns.  I was so lucky to be able to try out the Practically Perfect Girls Shirt Pattern by Muse of the Morning. 

Aztec Little Girl Shirt Pattern
If that isn't sass...I don't know what is. 


Christmas Pajama Marathon

Christmas Pajamas are my favorite.  They are a Christmas Eve Tradition.  Every Christmas Eve we open up 1 gift each person.  They are always pajamas.  My girls have caught on now and know thats what they get and they are so excited!

This year instead of buying those cheap pajamas from Walmart on black friday I decided to make my girls them.  So I took an entire day and made 4 pajama sets for each of my girls and 1 pair for my baby.  


We are jumping for joy! It's pajama day at school! This calls for new pj's. Good thing pajamas are a quick sew. Any ideas for Dr Seuss day tomorrow?!?


A little update.  The Whoville hair that I did for Dr Seuss day can be found HERE

Spearmint Rice Bag Hand Warmers Tutorial

For Christmas my daughter loves to make little gifts for her friends. This year she decided on making this little hand warmers.

Spearmint Rice Bag Hand Warmers Tutorial

Now my house smells like spearmint because of these little hand warmers

Spearmint Rice Bag Hand Warmers Tutorial

I pieced scraps of fabric together until they were close to 4x4 inches square.  Then with a coordinating piece of flannel for the back, and right sides together, sew around the edge of the bag.  Sewing the 2 pieces of fabric together.

Spearmint Rice Bag Hand Warmers Tutorial


Spearmint Rice Bag Hand Warmers Tutorial

Spearmint Rice Bag Hand Warmers Tutorial


Make sure to leave a little hole so that you can turn the bag right side out and fill with rice.

Then close up the hole by either hand stitching or sewing with your machine.

Aren't they adorable!?!

The printable I found at Love Pomegranate House

Let's Get Social

Image HTML map generator


Featured Post

Where Can I Buy Personalized LDS Baptism Gifts Online?