Showing posts with label sewing tools. Show all posts

Using a Butter Knife While Making a Quilt? Weird...Nope!

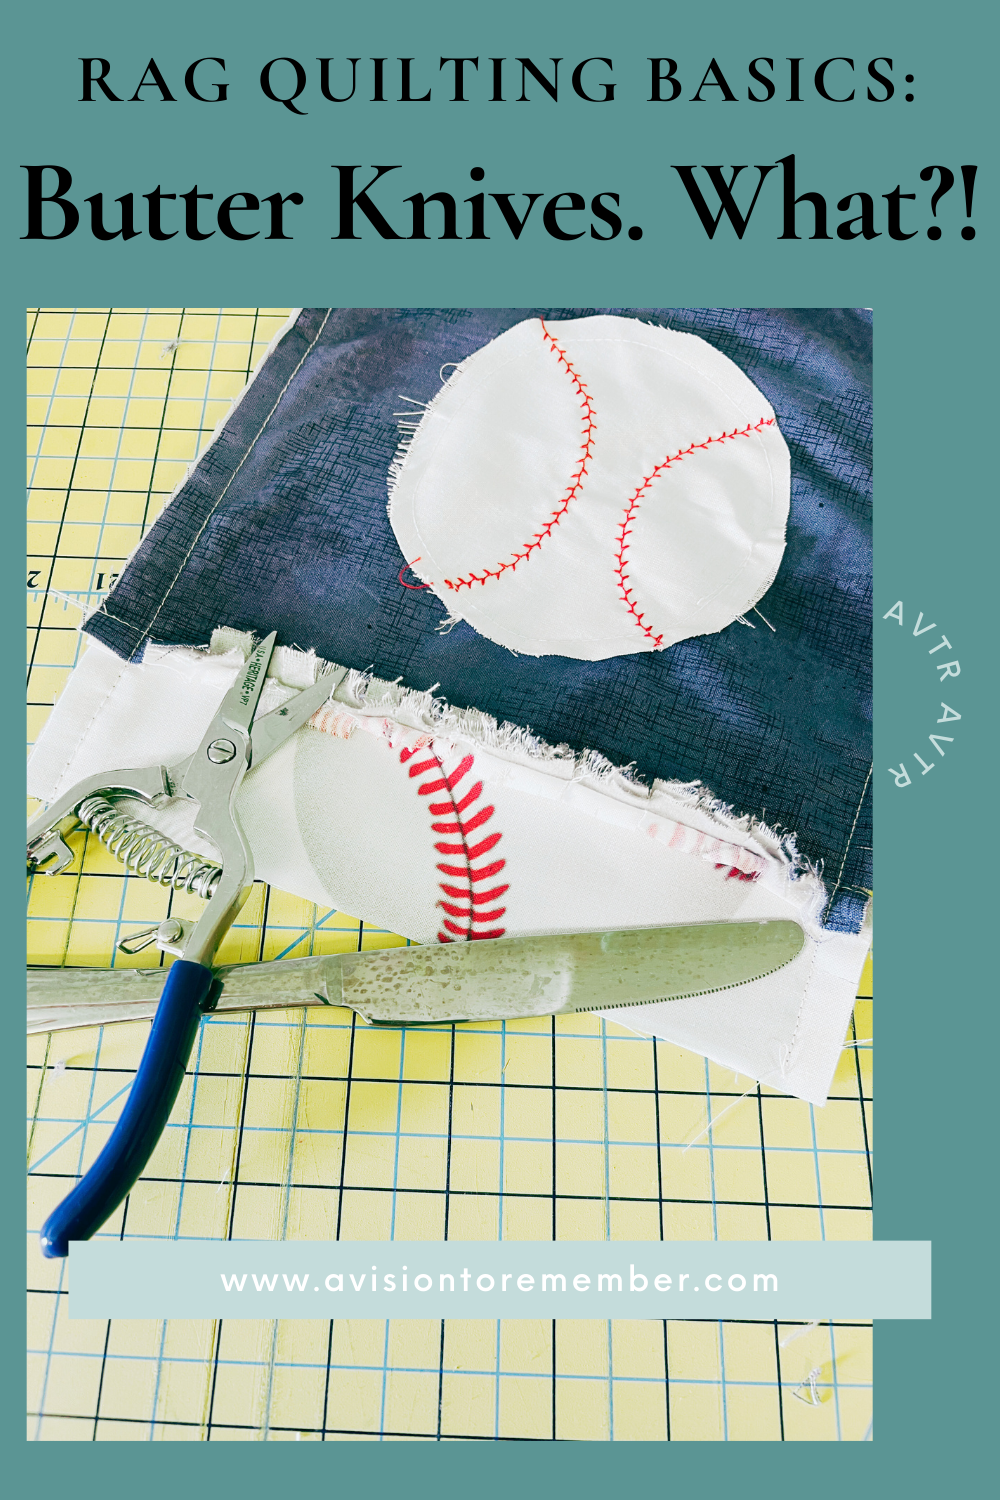
Rag quilts are a popular style of quilt that feature exposed seams that are frayed to create a soft and cozy texture. While many quilters choose to fray the edges of their rag quilts by washing and drying them multiple times, there is another method that can be just as effective: using a butter knife.


Here's how to use a butter knife to fray the edges of a rag quilt:

  1. Start by clipping the edges of the quilt so that they are all even.

  2. Take a butter knife and run the blade along the edge of the quilt, pressing down firmly as you go. The goal is to loosen the weave of the fabric so that it will fray easily.

  3. Once you have run the butter knife along the entire length of the edge, use your fingers to gently pull the loose threads away from the quilt. You may need to go over the edge with the butter knife a few more times to get all of the threads to loosen.

  4. Repeat this process on all four sides of the quilt until you have the desired amount of fraying.

    Watch as we butter knife a quilt block over on our youtube channel

One advantage of using a butter knife to fray the edges of a rag quilt is that it allows you to have more control over the amount of fraying that occurs. With washing and drying, it can be difficult to predict exactly how much the quilt will fray, but with the butter knife method, you can choose to fray the edges as much or as little as you like.

Also, if you miss clipping a seam, and notice after washing, just use the butter knife instead of laundering again. 

Another advantage is that it can be quicker than laundering the quilt multiple times. While laundering the quilt is certainly effective, it can be time-consuming and may take several cycles to get the desired amount of fraying.

In conclusion, using a butter knife to fray the edges of a rag quilt is a simple and effective  

Check out more sewing tips on our blog

  Image HTML map generator

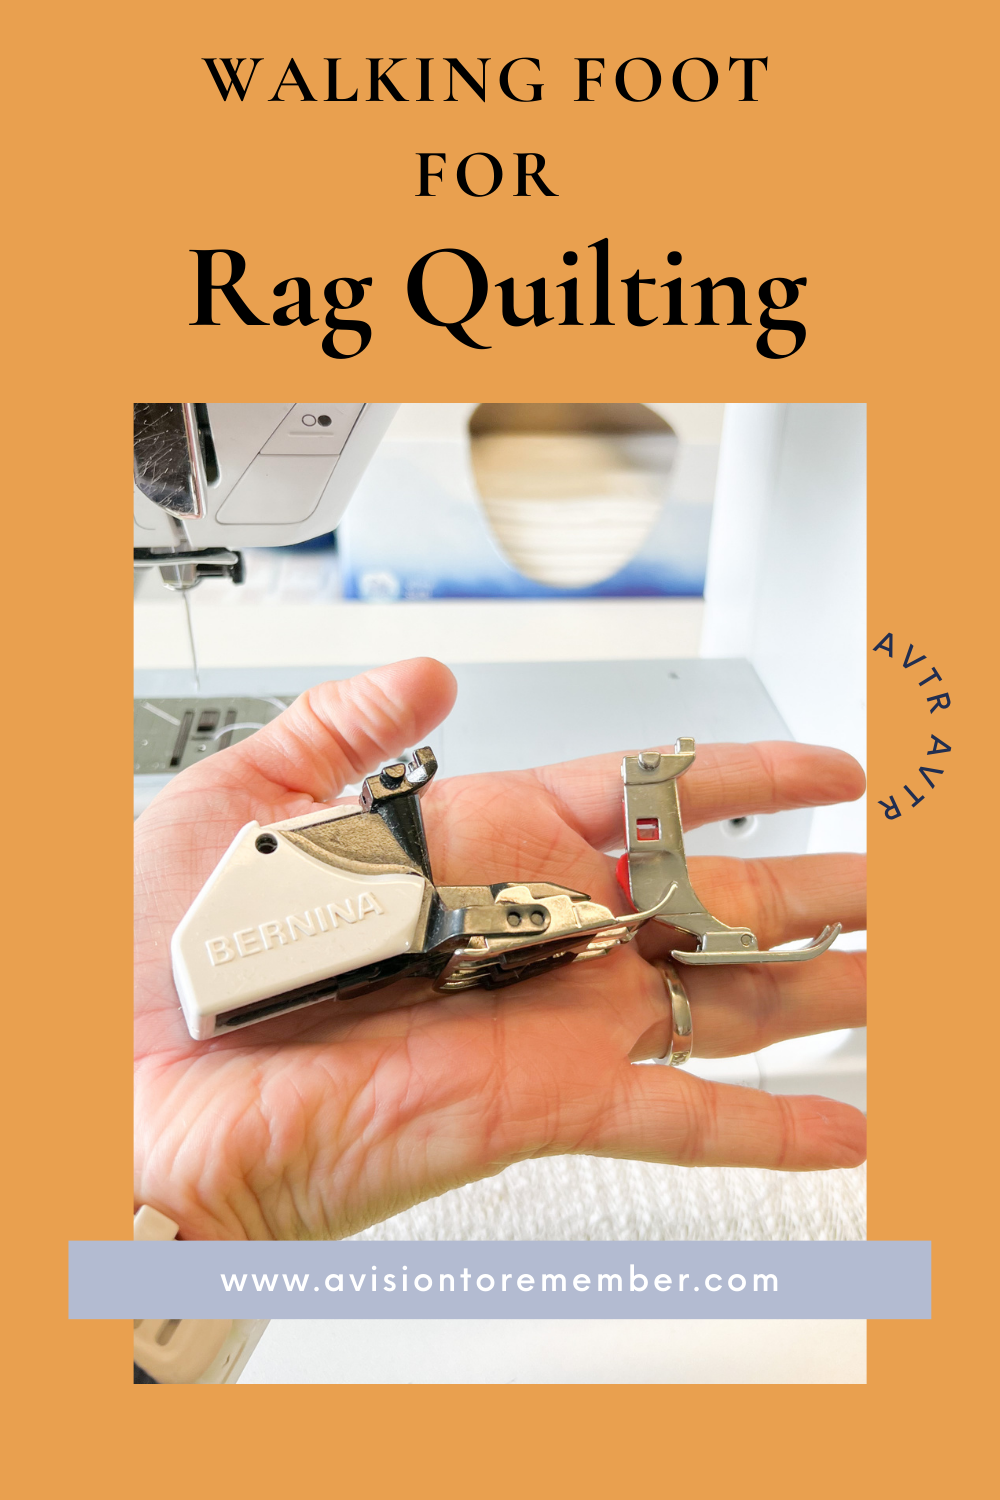
Should You Use a Walking Foot to Sew a Rag Quilt?


I often receive this question: Should I use a walking foot to sew a rag quilt? 

{affiliate links included in blog post. Thanks for your support!}

Sadly, and like most things in life, its not a cut and dry answer.

There are several factors that run into my decision, and possibly yours, when choosing a walking foot over a regular sewing machine foot. 

Fabric chosen for rag quilt

If I am using cotton or flannel fabrics only, I opt to use a regular sewing machine foot. If I am using minky fabric, then I always use a walking foot. Cotton and flannel don't have a lot of natural stretch to the fabric, and minky is very stretchy and slick. The walking foot helps the fabric move through evenly

Machine used to sew rag quilt 

If I am sewing on my industrial Juki DDL 8700 I don't have a choice. No walking foot for me. If I am looking for speed and a better quality stitch then I am using the Juki. 

Seam Allowance on rag quilt


Using a 1/2 inch seam allowance is kinda annoying with a walking foot. The foot is wider and it seems to grab the fabric and fold it over as I am going. So often I get frustrated and switch back to my regular foot. Not all sewing machine feet are the exact same width. This may  not be an issue with your machine or where you're comfortable with your seam allowance on your rag quilt

In conclusion, it really is a personal preference whether a walking foot is for you or not. And just like most things in rag quilting, there really isn't a right or wrong way to do things. 

Give the walking foot a quick go, if you like it, keep it! No harm in trying

How to Sew Using Large Thread Cones at Home-

(affiliate links below)


If you love sewing and are looking to complete large projects, use the same color of thread often, or are going to start a business or have a small home business, buying large cones at home can be more economical than purchasing smaller packages. Make sure you use quality thread so that it lasts longer. We love our cone tower from Amazon because it is metal so it won't break easily if you move your machine, take it to classes or put away. 

If you're interested in sewing, you probably already know that thread is a huge part of any successful project. The right thread can be the difference between an average-looking garment and one that really stands out! We sew the most with gray, white, and black.

Using a cone tower makes it possible to use large cones on sewing machines at home

We love this cone tower on amazon. The base is metal, and the stand is also metal. So it doesn't easily break.

We have used a plastic on in the past and if you ever move your machine, put it away, or take it to classes, I would definitely not recommend it. However it is a lot cheaper and lighter.


We recommend only purchasing cones if you will use them. Thread will break down overtime, several years. But if it is quality thread, it takes a lot longer. Investing in better thread will make a huge difference.

We have bought many different brands and types of thread over the years, some haven't held up and break easily and others are still great to sew with after 12 years of sewing.


Image HTML map generator

How to Thread a Needle Easily

Did you know 
...
That needles have a front and back?

I didn't either.

But they do. 


Watch as we easily thread a needle. 


One last thing...

Get the needle eye wet (a little spit didn't hurt any needle)

It will help so much!Image HTML map generator

How to Thread a Juki DDL-8700 Sewing Machine

When I first began sewing rag quilts for a living, I went through so many needles. I could have bought stock in Schmetz!

No joke! 

I bought the thickest needles I could find in my local big box craft stores. The typical Universal 90/14.

But I still broke needles. 

Every time I broke a needle I would:

  1. Stop sewing (duh)
  2. Change needle
  3. Clean out anywhere the broken part of the needle could have ended up
  4. Checked the seam in the quilt for any remnants of needle.
  5. Began sewing again

This process could take several minutes each time. I knew exactly where I would break the needles (always where 4 seams would cross at). Rag quilts can be bulky to sew through as they are made by sewing quilt back, flannel batting, and quilt top together at the same time. So where seams would meet I could be sewing through 6 layers of fabric, 4 of which were flannel. That is a lot of material! 

So after a few years, and many quilts later, we decided to add to my sewing machine collection and get a Juki DDL 8700. 

We picked it for several reasons. But I am guessing that if you are trying to figure out how to thread the darn thing like I did when I first bought it, you already know you need it.

Once you figure it out, it is really easy to rethread and takes just a second

Follow the video below and you'll be set in no time!


 Image HTML map generator

How to Clean A Sewing Machine or Serger from Dust Bunnies

{affiliate links below}
 
I don't know about you, but I sew enough that I am constantly combating the dreaded dust bunnies that accompany fabric. 
 
I have "heard" from my Bernina dealership to not use canned air as it can put moisture on the metal. Moisture and metal create corrosion. 
 
Plus, a canned air is plenty expensive for my taste and it never lasted long enough
 
So, I tried a vacuum
 
When that didn't work, I would blow my own air
 
Counterintuitive much?
 
Yes, moisture and metal create corrosion.
 
So we I came across a handy dandy tool on amazon.

Its a compressed air duster. 

 
No canned air required.

 So now, when I need to clean out my sewing machine, serger, laser, or whatever else that has pesky dust bunnies. A quick little treatment with the compressed air duster, and I am set!

Watch the short video below to see it in action.


 Image HTML map generator

How to Thread a Needle

Threading needles can be one of the most frustrating parts of sewing. Right!?

But I have found a couple really simple tricks that help when I am trying to thread a needle. They work EVERY Time

  • Needles have Front and Back - If the needle is being stubborn and not threading...turn the needle around and try to thread it from the other side. 
  • Wet the needle NOT just the thread - Out of habit I always stick thread quickly on my tongue to get it damp. But it makes all the difference when I do the same with my needle.   
  • Give the end of the thread a quick trim - If the thread has any kinks, fibers, or other small things on the end it will prevent it from easily going through the eye of the needle. Give that thread a quick trim, even if you trimmed it and wasn't successful in threading the needle once. 

Have you given these tricks a try? I bet ya that they work 1

 This works for sewing machine needles, yarn needles, quilting needles, embroidery needles, and every other needle imaginable to man kind.

  Image HTML map generator

Rag Quilt Seam Allowance

Want to make your own? Get the pattern!
My step-by-step rag quilt patterns take the guesswork out of it — perfect for making your own.
Shop Rag Quilt Patterns »

Seam allowances and rag quilts are a funny topic among avid rag quilters. There really is no right or wrong answer when it comes to answering this age old questions.  But there might be a right answer for you!


Let me help you decide which seam allowance is best for you.   

 Rag Quilt Seam Allowance 1/2 inch 

How to Determine the Best Rag Quilt Seam Allowance

  1.  Fluffiniess vs hiding fabric - the width of the exposed seam allowance will partially cover up the fabric underneath it. But rag quilts are also known for the fluffy exposed seams. If using a small block, reduce the width of the exposed seam (the seam allowance) to allow for the block to be more visible (for example a 5 inch block with a 1 inch seam allowance will only show about 3 inches of the block. Versus a 5 inch block with a 1/2 inch seam allowance will show 4 inches of the block)
  2. Clipping the Seams - the width of the clipped seams also lends to the how fluffy the exposed seam is. Clip 1/8th inch apart from each other for a very ragged effect, or clip 1/4 inch apart as the picture above is. 
  3. Type of Fabric - if using 100% cotton fabric, the exposed seam will really fluff up a lot. Cotton frays, which is exactly what is wanted for rag quilts. A wider seam allowance will be great with 100% cotton fabrics. If using polyester, minky, or other fabrics that don't fray as well, a smaller seam allowance will be best. 

I personally use (and prefer) a 1/2 inch seam allowance. Especially because of the skinny rectangles I most often use in quilts. It allows for more of the rectangle to be visible. 

I also prefer it over a wider one, as that is the perfect width for the scissors that I use to easily open up to, the clip the next spot. 

These are the scissors I personally prefer (and a post about all the ones I have tried)

In 2021 alone, I sewed and clipped over 200 quilts for A Vision to Remember (also known as avtrboutique.com)
For all of the majority of those quilts, I used the Easy Peasy Rag Quilt pattern with a 1/2 inch seam allowance.


I also use a simple little straight edge magnet and place it on my seam allowance line on the plate on the sewing machine.  This helps me to create a consistent seam allowance every single time without guessing. I have also used this little trick with my 13 year old that has become a wonderful seamstress. Check out these magnetic seam allowance guides on amazon

 Check out all of our Rag Quilting Basics here on our blog!

As always, please let us know if you have any questions by emailing me at Bobbie@avisiontoremember.com


Image HTML map generator

Best Fabric for Rag Quilts: Flannel, Cotton & More

Want to make your own? Get the pattern!
My step-by-step rag quilt patterns take the guesswork out of it — perfect for making your own.
Shop Rag Quilt Patterns »

The type of fabric you choose for your rag quilt is very important. The frayed edges, and washing the quilt AFTER you’ve assembled and BEFORE using it, make rag quilting very unique. So here are a few tips on choosing the right fabrics, and why. 


To choose the best fabrics for rag quilts, or to see if you have the right fabrics for your rag quilts here are a few characteristics of good rag quilt material: 

100 percent cotton. Cotton fabric frays. Polyester fabric does not. If you want your exposed seams to fray and get really fluffy, then you will want to choose 100 percent cotton fabrics. How do you know if the fabric is 100 percent or not? Look at the top of the bolt for the fabric content. If it says 100 percent cotton, you are good to go. If you love a fabric that is not 100 percent cotton, it will be ok! But keep in mind that wherever that fabric is in your quilt, it will not fray. The flannel underneath it, and the cotton fabrics surrounding it, will all fray and get really fluffy. But the non-cotton fabrics, especially polyester, will not. This includes Minky, fleece, and broadcloth fabrics. They will not fray at all, but if you don’t mind that your exposed seams are not fluffy, then go ahead and use these fabrics. If you REALLY want a Minky back to the quilt, check out the best method for adding one. 

Softness. When I am snuggled up under a quilt, I want it to be soft and cuddly. When choosing fabric in your local quilt shop, make sure to get a feel for the fabric, and not just the looks of it.

 • Colorfast fabric. I can’t tell you how many quilts I have ruined over the years because I bought a cheap fabric, thinking I needed to save a buck, then saw that one fabric bleed into all my other fabrics after my beautiful quilt was sewn together and washed. Red fabrics are the worst! But I will tell you my little secret for avoiding the dreaded fabric bleed: Buy designer fabrics. Riley Blake is my favorite, but you can also use Cloud 9, Moda, Art Gallery, Windam Fabrics, Robert Kaufman and others. They are all amazing quality, but more important, when I’ve used these fabrics, they have never bled. Not once. 

If you are shopping in a big box store and find the fabric that you can’t live without, give that fabric a couple of good prewashes before you put it in the quilt. After the quilt is finished, throw in a color catcher when you wash it, especially the first two or three times. 


 • Flannel or cotton? Contrary to popular belief, flannel fabric is not the only fabric one can use to make a rag quilt. Flannel frays amazingly well, but quilting cottons also fray pretty darn well too.
For all of my rag quilt tops, I use a combination of flannels and cotton fabrics for the top layer of the rag quilt. I actually prefer to use only cotton fabrics for the tops of rag quilts. Flannel fabrics that have designs on them seem to look dull after a few washes, and begin to look not as bright as the rest of the cotton fabrics in the top of the quilt. I’ve seen flannel fabrics (especially discount flannel fabrics) begin to look very worn after being washed only a handful of times. After putting in all that time and money to make a beautiful quilt, I would get discouraged if the quilt began to look old after using it only a couple of times. So I try to stick with quilting cottons for the top of the quilt.

For the back of the quilt, I use solid flannels. I’ve found that the majority of the time, even inexpensive solid flannels hold their colors and don’t fray or peel as much as the flannel prints. Plus, flannel solids are available in a huge assortment of every color of the rainbow, with many colors in between. My absolute favorite brand is Robert Kaufman for flannel solids and we carry them in our online fabric shop.


• Quality. I am sure you’ve heard a million times that it is best to buy designer fabrics from your favorite quilt shop. I tend to lean to this opinion. I have made so many quilts over the years, and the quilts with the designer fabrics from the brands we all know and love have held up the best.
But, I have also found some very beautiful, quality fabrics at the big box stores, and these also have held up through the years. When you are choosing fabrics, take time to run each fabric through your fingers and make sure it feels nice. Look at how tight the weave is; if it is loose it will not hold up very well. Hold the fabric up to see how well it drapes. If it is really stiff and doesn’t drape well, then it probably will not be comfortable to snuggle up with.


Choosing the right fabrics for your rag quilt is very important if you want a long lasting quilt to treasure for yourself or to give to a special person, especially when you put so much time, effort, and money into making such a unique and beautiful quilt. 

Make sure to check out all of the rag quilting resources on our blog, including which scissors to choose, walking feet, how to wash a rag quilt, rag quilting seam allowances, a wide variety of quilt patterns, and more!

Image HTML map generator

10 Essential Sewing Tools for the Beginner Seamstress

10 Essential Sewing Tools for the Beginner Seamstress
I don't know about you, but when I go look at the notions wall in Joanns or Hobby Lobby I never know exactly what to get.  Why, you ask?  You are a good seamstress aren't you?

Well, yes,  I am pretty good, but that wall is HUGE!  It has TONS of different things on it.  Then I start calculating everything up in my head and I could EASILY spend a couple hundred dollars on all of that "stuff"  The problem is....Do I really need all that stuff?

Nope.

Do you really need all that stuff?

6 Easy Alternatives to Pinning Fabric When Sewing

Love these sewing tips? Make a rag quilt next!
Grab one of my step-by-step rag quilt patterns and put these tips to work.
Shop Rag Quilt Patterns »
For me, pinning might be the MOST tedious task EVER when sewing. I know, I know...Pinning is an essential part of sewing. Or is it?
6 Alternatives to Pinning Fabric-Fabric Glue, Basting Tape, Clips, and Walking foot


Simple Organization for a Sewing Room Cutting Table

I don't know if you remember awhile back, I posted my craft room. It worked really well at that point, but lately, not so much. My quilting rulers, rotary blades, pins, pencils, scissors, making pens, and all those little sewing gadgets that I have at my cutting table have been cluttered. I sit down a pair of scissors and 2 seconds later they are buried under piles of fabric and I can't find them anymore!

Please tell me I'm not the only one!?

I've had on my mind for the last few months that I need to do something. It's not efficient. I was wasting time, energy, and getting frustrated. So when I walked into the Dollar Spot section in +Target  and saw these cute paper holders ($3/each), and pen holders ($1 each), I knew that they would work perfectly for my quilting rules and other cutting accessories.


Simple and Cheap Sewing Room Organization

As soon as I got home, I hurried to my garage and looked for board that would work and had my husband cut it down to size.

Then I spray painted the board to match my walls and trim.  

Then I used wood screws and secured the board to the studs in the wall. 
How to Secure paper organizers to wall for quilting rulers
To secure the baskets to the board I used picture hanging hooks.  I also used the little c hooks for the pencil holders
Pen Holder used for Sewing Room Organization
Then I also screwed some magnetic pieces to the board (I found them on Ebay) and painted them the same color as the board.

I just love how simple (and cheap!) this board ended up being.  Plus, it will keep me a lot more organized, which equals being more efficient, which gives me more time to spend with my little kiddos.

#win-win
Cutting Table Sewing Organization

Image HTML map generator

Best Place to Buy Rotary Cutter Blades


Do you ever get sick of paying $8 or more for 1 rotary blade?  I know that I do.  

Even with a coupon at the local craft stores rotary blades will cost you a $5 dollar bill.  

Not anymore! 

If you have a +Harbor Freight Tools (OFFICIAL) head on over there when you need new blades.  They are in the carpet section of the store.  They come in packs of 2 and are around $3. 

I love saving money.  Especially if you combine  saving money on buying blades with sharpening your blades with tin foil.  Its Money in the Bank!

Essential Tools for Sewing

We all have our favorite sewing tools. Here are the ones that are most important to me:
  1. My sewing machine. It was a Christmas gift from my parents a few years back. It is a Bernina 1008. It is the perfect machine for me. It is very basic. Not computerized, but man its a workhorse.
2. A really good pair of scissors. Mine are Gingher. My hubby and kids know that if you cut something other than fabric with these I might just come unglued. They are definitely expensive scissors but they are worth every penny.
3. Rotary Cutter. I have a fiskars version. I change my blade about once a month, but I cut yards, and yards of fabric also.
4. A cutting mat. The first one I bought was a package deal with my rotary cutter and ruler from fiskars. It worked great. It was 18 x 24 maybe? Well it worked great until there were ravines from me cutting in the same spot many times. Then I set my iron on the board not thinking anything of it but it warped it bad. So finally I broke down with my hubbys help and bought a much larger, self healing, reversible, cutting mat. It is 24 x 36 ish and looks like this:I love it. It works great for what I do. I use my cutting board everyday almost.

5. A cone thread stand. This thing is really great for using those large cone threads for your serger in the sewing machine. The cone thread is much more economical to use. You are not constantly changing out the thread because you ran out. Plus it costs a little bit more than the small things of thread.
I got mine at Joann's for $5-$10. You could use a coupon or buy it when they have their notions on sale for 50% off which happens fairly often. Definitely worth the money.

6. A small pair of scissors to cut thread. The scissors that I use came from my provo craft paper trimmer when I bought it. I actually have 2 pairs of scissors that are about the same size. One sits at my sewing machine and the other at my serger when I have it out.
7. Lots of extra sewing machine needles because I always break mine at the most inconvenient of times. I have had to call my hubby and ask him to stop by the store to get me more needles when he comes home from work. Then I wait very impatiently because it would be a waste for me to drive to town to just get needles when he will be coming home in a few hours.

8. Several extra bobbins. I think I have around 20 bobbins. When I am doing a bigger project before I thread my machine I wind up several bobbins of the same color. That way when my bobbin runs out of thread then I have some all ready to replace it without having to unthread my machine to wind another bobbin. Saves lots of time and frustration. If you don't have a bunch of bobbins already and think you might need some more make sure that they will fit your machine. My mom gave me some bobbins that did not fit my machine and many needles later I figured out it was the bobbin breaking my needles.

9. One of the best things I ever did when setting up my sewing table was to get a small set of drawers for next to my sewing machine with all the small essentials (like bobbins, needles, scissors, unpicker, ruler, calculator, etc). I got mine at walmart but I know lots of other stores that sell them to.
I am thinking I am going to get a set of drawers like this to sit next to my sewing machine for things like my regular cutting scissors, thread, velcro, elastic waistband, and all those other little sewing things that I need at the sewing machine.

10. A good place to store your fabric. I use those plastic drawers to store the fabrics that are less than 2 yards. I have 2 sets of them. For the fabrics that I buy by the bolt I keep on the bolt behind my couch, but I really need a bookcase to store them on so that I can see them. I have some fabrics that I keep forgetting about that are behind the couch.

If bolts would work well for you the fabric stores just throw away or recycle the cardboard pieces so just ask to take some home with you. I almost always leave the store with a couple of them. They are really handy for storing fabric on. It keeps it from getting wrinkled.

Do you have any tips or tools that are essential to you successfully sewing?

The Best Scissors for Rag Quilts (Tried & Tested)

Want to make your own? Get the pattern!
My step-by-step rag quilt patterns take the guesswork out of it — perfect for making your own.
Shop Rag Quilt Patterns »

*Affiliate Links Below. Thank you*

If you haven't noticed, then let me point out that I have made just a few (ok probably a thousand) rag quilts in the last few years.

I have learned the hard way that having a REALLY good pair of scissors will make all the difference


I often have people ask what kind of scissors I use for the rag quilts so here is my 2 cents

A pair of scissors with a short blade is a must. You can try to cut the blanket with your regular sewing scissors but you will not be able to cut all the layers at once and you will have more holes in your blanket from cutting the seams. The seams are not to hard to fix, but who wants to resew what they already sewed once.

Your hands will be sore, but you can do it. If you are only going to make one rag quilt in your entire life, don't go spend extra money on nice rag quilt scissors because it will be a waste of money.

I have 3 examples of scissors that I know work better than regular scissors for rag quilts.  Each of the following pictures are linked to Amazon as an Associate

I started out with this pair of scissors: 

olfa 5 inch rag quilt scissors


They worked great. Especially when I was just doing a blanket every once in awhile. Then when I started to sell the blankets I realized that those scissors would not cut it. I would have blisters and dents in my fingers from the handles. These scissors were about $20.00. They are Olfa, so the Cadillac of cutting for sewing.  My husband prefers these scissors over any others that we have tried (and yes he helps me clip a lot of quilts)

fiskars easy action rag quilt


These scissors run about $20.00 but can be found at Joanns and other fabric stores. So make sure if they are not on sale to print off a coupon so you can get the best price possible.

These scissors are great for thin clipping. Around the edge of the quilt, yes! Thin layers of only cotton, Yes! But if you're doing flannel or levi, don't even try it, unless you cut each layer individually. But that would be sooo tedious.

These next scissors are the scissors that I use regularly. I am very biased because I am in love with them.

Heritage 6.5" Rag Quilt Scissors


They are made by Heritage. These babies will cut through 7-8 layers of fabric at a time. They never make my hand fatigued. I am in love with them. They work like a charm. I do have one thing that I don't like about them (isn't there always something :) My hand slides up and down the handle as I am cutting. It does not hinder my cutting, just annoying. 

Do not be persuaded to buy the scissors that look very similar. There are dupes out there that are not quite as comfortable. Its worth paying the extra $10-15 for the Heritage scissors. Promise!

*NOTE: as I sit here and go through this blog post 12 years later (WOW) my opinion hasn't changed. I still use the heritage brand scissors. I have a pile of 15 of them, because each time one pair becomes dull from clipping many, many blankets, I just buy a new pair. They are serrated and I haven't found a good scissor sharpener in my area that has done a good job sharpening. I would love to get them all sharpened! They're all stuffed in a drawer, and I have given several away over the years. 

So all in all. I definitely would splurge and get the heritage scissors. Even if you don't make another rag quilt you will be grateful to have used these beauties. Some of my extra pairs have ended up in my husbands tools, in our car jockey box, and other random places. They not only are great rag quilt scissors, but also great scissors!

If you have any questions about these scissors or any others please let me know. I would also love to know if you have favorite pair of scissors and what they are used for (even if you don't have rag quilt scissors)

Let's Get Social

Image HTML map generator


Featured Post

Where Can I Buy Personalized LDS Baptism Gifts Online?